Commercial Awning Installation Guide for Outdoor Spaces
- Andrew Crookes

- Feb 9
- 8 min read
Outdoor dining has become a staple for many Yorkshire venues, yet unpredictable British weather often limits its success. When planning to install a new awning, the process can feel daunting with safety, durability, and design all competing for attention. This guide breaks down each step of commercial awning installation so you can create a comfortable, visually appealing, and regulation-compliant outdoor space that attracts customers and maximises your investment.
Table of Contents
Quick Summary
Key Point | Explanation |
1. Thorough Site Assessment Needed | Conduct a detailed site evaluation to ensure safety and structural integrity before installing the awning. |
2. Select the Right Awning Type | Choose an awning configuration that balances functionality and aesthetics to enhance your commercial space. |
3. Secure Accurate Mounting Points | Mark and secure appropriate mounting points that can reliably support the awning’s weight and withstand environmental conditions. |
4. Precision in Framework Installation | Follow systematic assembly steps to ensure stability and durability in the awning framework before adding the canopy. |
5. Conduct Comprehensive Testing | Perform operational tests to confirm all components function correctly and maintain safety standards before usage. |
Step 1: Assess Site and Prepare Installation Area
Before installing a commercial awning, you’ll need to thoroughly assess and prepare your installation site to ensure safety, structural integrity, and optimal performance. This critical first step involves a comprehensive evaluation of your outdoor space to determine the most suitable location and conditions for your new awning.
Begin by conducting a detailed site survey, focusing on key aspects that will impact your installation. Risk assessment guidelines recommend examining several crucial elements:
Surface condition: Check the mounting area for structural soundness
Clearance requirements: Measure available height and width
Load-bearing capacity: Evaluate wall strength and potential mounting points
Environmental factors: Consider wind exposure, sunlight direction, and potential obstructions
Your site assessment should also prioritise safety protocols outlined in the Construction Design and Management Regulations. This means thoroughly documenting potential hazards and creating a comprehensive plan to mitigate risks during installation.
A meticulous site assessment prevents costly mistakes and ensures a smooth, professional awning installation.
When measuring your space, use precise measuring tools and record dimensions carefully. Take multiple measurements to confirm accuracy, paying special attention to:
Exact wall mounting height
Precise horizontal width available
Structural support points
Potential drainage considerations
Commercial properties require extra diligence, as installation impacts both aesthetic appeal and functional utility. Consider how the awning will interact with existing architectural features, pedestrian traffic, and customer experience.
Expert Recommendation: Always consult a professional surveyor if you have any doubts about your site’s installation suitability or structural requirements.
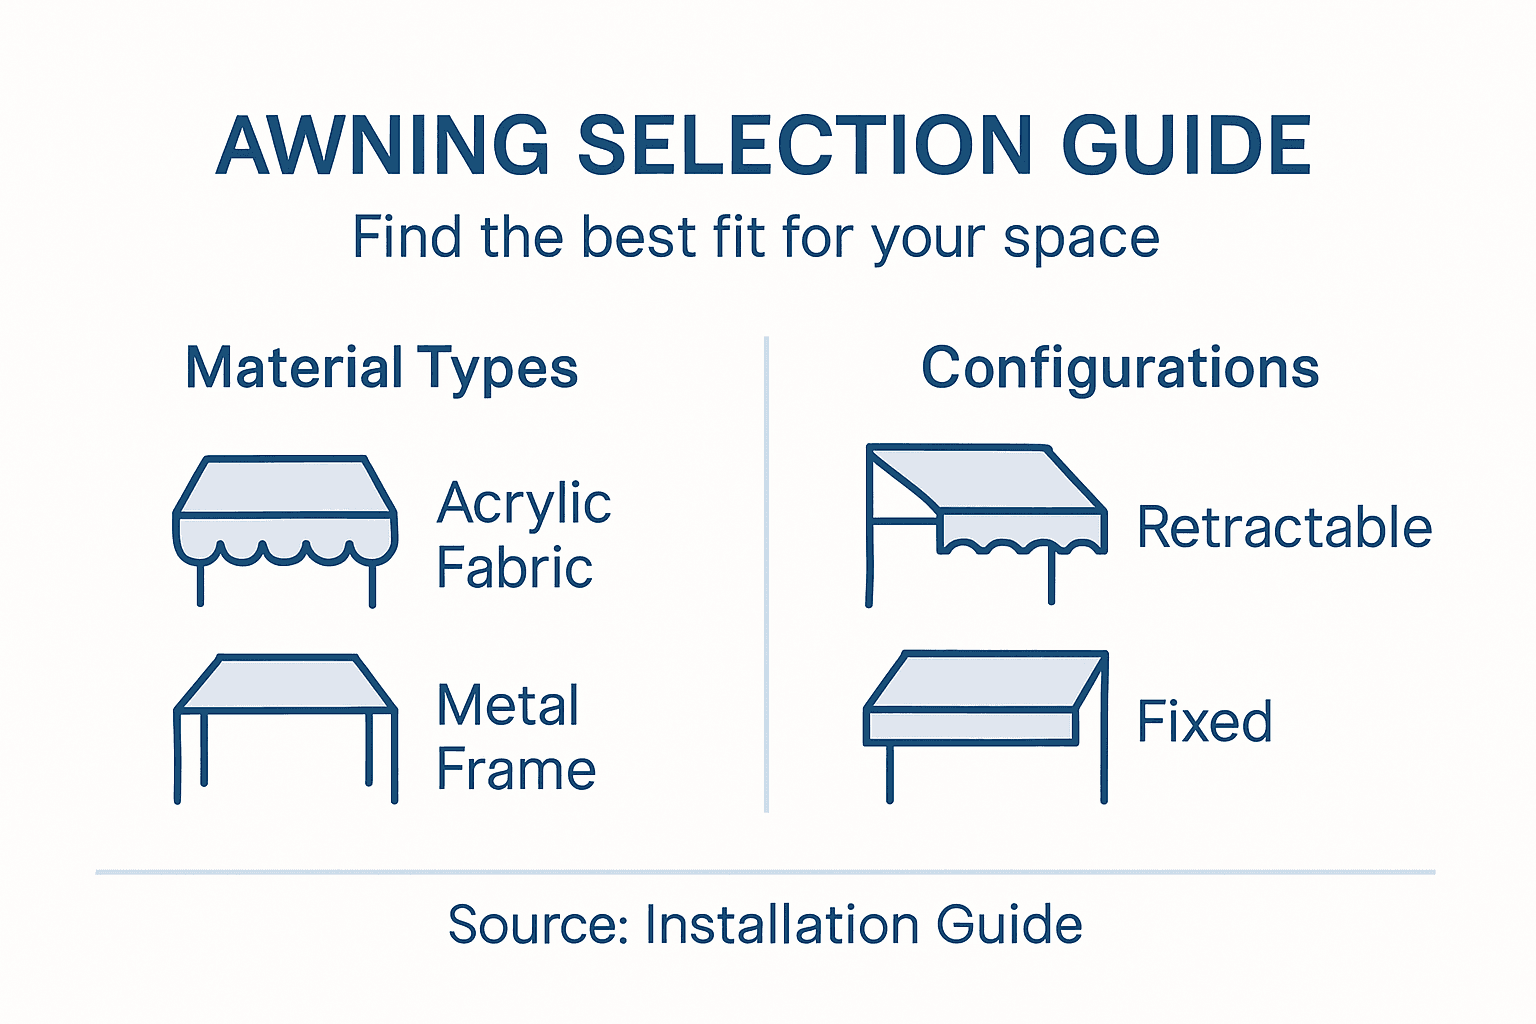
Step 2: Select Suitable Awning and Configuration
Selecting the right awning for your commercial space requires careful consideration of both functional requirements and aesthetic design. Your chosen configuration will directly impact customer comfort, brand image, and overall outdoor space usability.
Start by evaluating key configuration factors that will influence your awning selection. Outdoor space design principles suggest considering how the awning integrates with existing architectural elements and enhances the overall environment.
Consider these critical selection criteria:
Size and coverage: Determine precise area needing shade
Mounting options: Wall-mounted, freestanding, or recessed installations
Fabric durability: Weather-resistant materials suited to British climate
Operational mechanism: Manual or motorised retraction
Additional features: Integrated lighting, heating elements, or wind sensors
The perfect awning transforms an ordinary outdoor space into an inviting commercial environment.
For commercial settings like restaurants and bars, prioritise configurations that offer maximum flexibility:
Assess total usable outdoor area
Determine peak customer capacity
Evaluate sun and wind exposure
Consider potential seasonal variations
Commercial properties require awnings that balance practical functionality with aesthetic appeal. Choose configurations that complement your building’s architectural style while providing optimal shade and weather protection.
Key configuration types include:
Here’s a quick reference of common commercial awning configurations and their ideal applications:
Awning Type | Best Used For | Key Benefit |
Retractable lateral arm | Cafés and retail entries | Flexible shade control |
Fixed frame pergola-style | Large patios and terraces | High wind stability |
Cassette with integration | Design-sensitive locations | Sleek, concealed appearance |
Modular, expandable system | Event spaces and pubs | Easily adds extra coverage |
Retractable lateral arm awnings
Fixed frame pergola-style coverings
Cassette awnings with integrated design
Modular systems with expandable options
Expert Recommendation: Arrange a professional consultation to match your specific commercial space requirements with the most appropriate awning configuration.
Step 3: Mark and Secure Mounting Points
Securing mounting points is a critical phase in awning installation that demands precision, safety, and meticulous attention to detail. Your goal is to create robust, reliable fixing points that will support the awning’s weight and withstand environmental challenges.
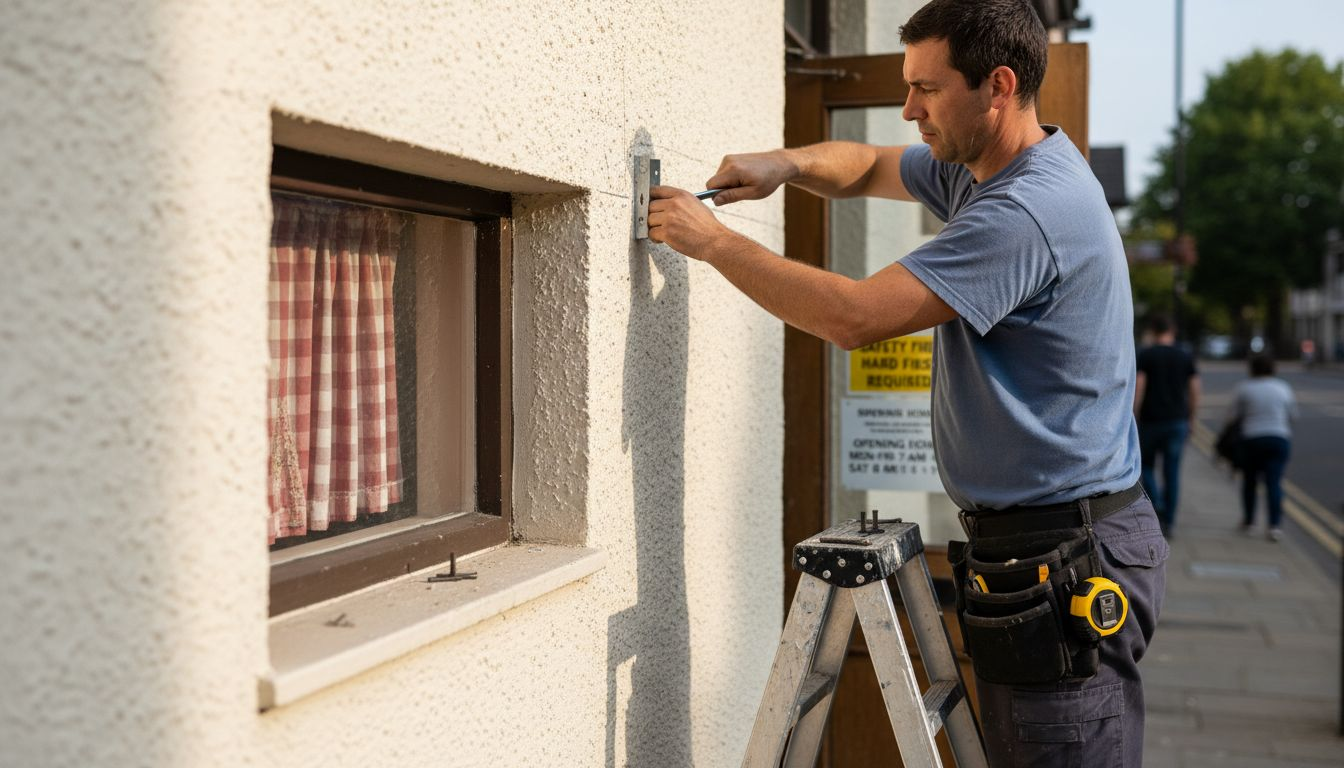
Begin by carefully studying your wall’s structural composition and identifying suitable mounting locations. Work equipment installation regulations emphasise the importance of selecting structurally sound attachment points that can bear the awning’s load safely.
Key considerations for marking and securing mounting points include:
Wall material assessment: Brick, concrete, timber frame, or metal surfaces
Structural integrity: Verify load-bearing capacity
Precise measurement: Use digital laser measuring tools for accuracy
Marking technique: Use high-visibility marking tools
Fixing type: Match appropriate fixings to wall material
Accurate mounting point selection is the foundation of a safe and durable awning installation.
Follow these systematic steps for optimal mounting:
Locate and mark wall studs or structural support points
Use a spirit level to ensure horizontal alignment
Double-check measurements before drilling
Select corrosion-resistant fixing hardware
Commercial installations require additional scrutiny. Inspect the mounting surface thoroughly and consider potential stress points that might compromise the awning’s stability.
Your mounting hardware selection should include:
Expansion bolts for masonry walls
Coach screws for timber structures
Chemical anchors for complex surfaces
Load-rated fixing systems
Expert Recommendation: Invest in professional-grade fixing hardware and consider consulting a structural engineer for complex or high-load mounting requirements.
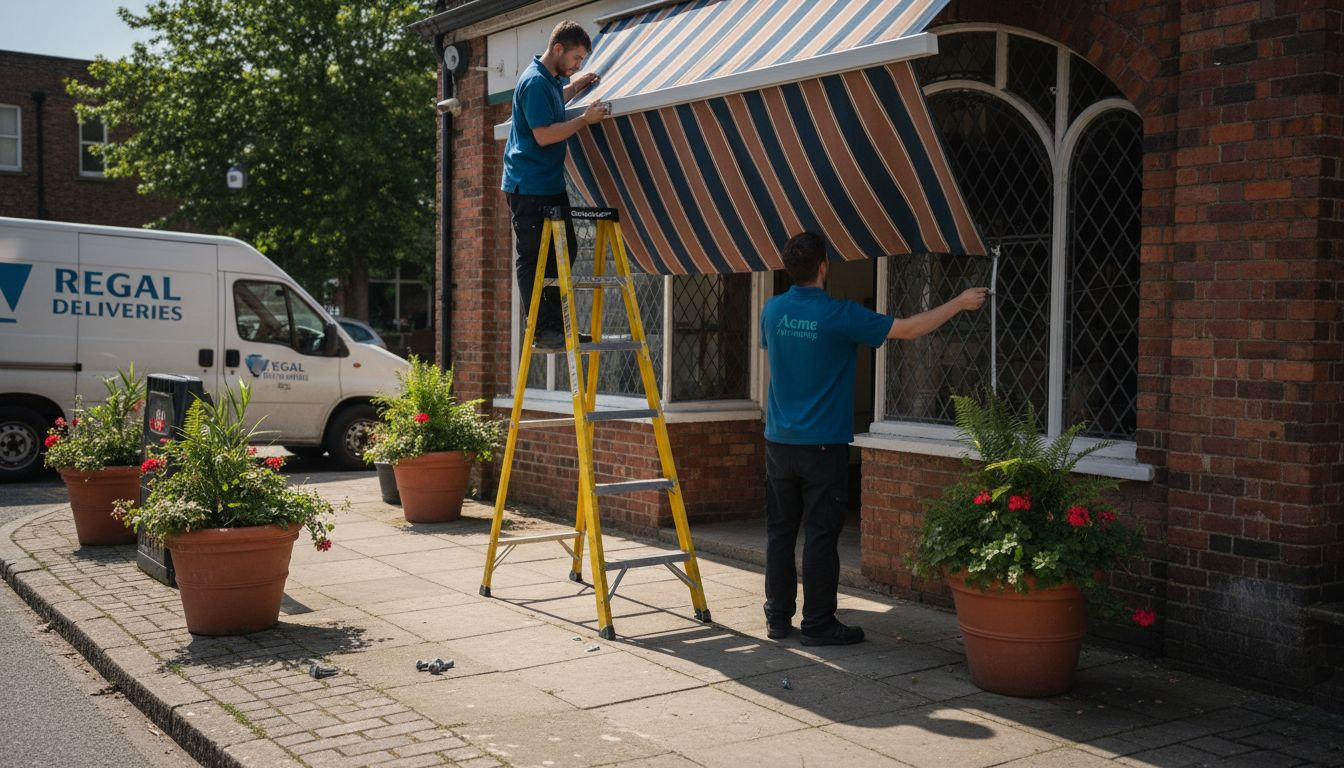
Step 4: Install Awning Framework and Canopy
Installing the awning framework and canopy represents the most critical phase of your commercial awning project, where precision engineering meets practical design. Your goal is to transform carefully prepared mounting points into a fully functional, aesthetically pleasing outdoor structure.
Commercial installation techniques emphasise systematic assembly and careful component alignment to ensure structural integrity and long-term performance. Begin by laying out all framework components systematically, checking against your original measurements and design specifications.
Key framework installation steps include:
Assemble main structural supports: Connect primary frame elements
Check horizontal alignment: Use spirit level for precise positioning
Secure intermediate mounting brackets: Ensure even weight distribution
Verify structural rigidity: Test connections before final fabric attachment
Prepare for canopy installation: Clean and prep surface areas
Precision during framework installation determines the awning’s ultimate performance and durability.
Follow these detailed framework assembly instructions:
Position primary support arms symmetrically
Attach mounting brackets using pre-selected fixings
Align and level framework components
Tighten all connection points incrementally
Conduct preliminary stability assessment
Commercial installations demand extra attention to detail. Pay particular focus to load-bearing connections and ensure every component meets professional standards.
Canopy installation requires careful technique:
Unfold fabric smoothly to prevent stretching
Align fabric edges precisely
Tension fabric evenly across framework
Secure attachment points methodically
Check for wrinkles or misalignments
Expert Recommendation: Always have a second person assist during framework and canopy installation to ensure safety and precision.
This summary highlights the main installation steps alongside common challenges and mitigation strategies:
Installation Phase | Likely Challenge | Recommended Solution |
Site assessment | Hidden structural issues | Hire a professional surveyor |
Marking mounting points | Inaccurate measurements | Use laser tools and double-check |
Framework/canopy fitting | Frame misalignment | Work in pairs, verify with level |
Final operational testing | Mechanical or motor faults | Follow full test protocols |
Step 5: Test Operation and Inspect Installation
The final phase of your commercial awning installation involves comprehensive testing and inspection to ensure optimal performance, safety, and compliance with regulatory standards. This crucial step validates the quality of your entire installation process and confirms the awning’s readiness for commercial use.
Work equipment inspection regulations mandate thorough operational testing to guarantee equipment safety and functionality. Begin by conducting a systematic evaluation of your newly installed awning’s mechanical and operational characteristics.
Key operational testing parameters include:
Mechanical movement: Test full extension and retraction
Motor functionality: Check electric operation smoothness
Fabric tension: Verify even fabric distribution
Structural stability: Assess overall framework rigidity
Safety mechanisms: Confirm emergency stop functions
A comprehensive inspection prevents potential future operational issues and ensures customer satisfaction.
Follow these detailed testing procedures:
Perform multiple full extension and retraction cycles
Check alignment and tracking during movement
Test manual override mechanisms
Inspect all connection points for stability
Verify electrical components and controls
Commercial installations require meticulous attention to detail. Pay special focus to:
Load-bearing performance
Fabric integrity
Mechanical precision
Safety compliance
Aesthetic finish
Conduct a comprehensive visual and functional inspection:
Check for any unusual sounds during operation
Ensure smooth, uniform movement
Verify all mounting points remain secure
Test wind resistance capabilities
Confirm fabric remains taut and correctly positioned
Expert Recommendation: Document your entire testing process with photographs and written notes to maintain a professional installation record.
Enhance Your Commercial Outdoor Space with Expert Awning Solutions
Understanding the challenges of commercial awning installation like assessing site safety, selecting the right configuration, and ensuring secure mounting points is vital for any business aiming to maximise outdoor space usability. Whether you face complex structural layouts or need a bespoke retractable system that blends style with durability, Infinity Awnings specialises in tailored shading solutions designed specifically for commercial settings. Our expertise addresses common pain points such as fabric tensioning, mechanical reliability, and weather-resistant materials ensuring your investment delivers lasting comfort and aesthetic appeal.
Discover how our premium range of awnings, pergolas, and verandas can transform your outdoor areas with easy operation, custom designs, and professional installation across Yorkshire, Derbyshire, Nottinghamshire, and Lincolnshire. Take the first step to safeguard your business’s outdoor environment by visiting Infinity Awnings for a free consultation. Explore tailored options and expert advice to avoid common installation pitfalls discussed in our Commercial Awning Installation Guide for Outdoor Spaces. Ready to improve your commercial property today? Contact us now and secure a solution that truly fits your space and operational needs.
Frequently Asked Questions
How do I assess the site for commercial awning installation?
To assess your site, evaluate the surface condition, clearance requirements, load-bearing capacity, and environmental factors. Measure the height and width available, and document potential hazards to ensure a safe installation area.
What factors should I consider when selecting a commercial awning?
Consider the size and coverage needed, the mounting options available, fabric durability for local weather conditions, operational mechanisms, and any additional features such as lighting or wind sensors. Prioritise configurations that enhance both customer comfort and the overall aesthetic of your space.
How do I mark and secure mounting points for the awning?
Mark and secure mounting points by assessing the wall material, verifying structural integrity, and using precise measurement tools. Select appropriate fixing types for the wall material to ensure stability and safety during installation.
What steps are involved in installing the framework and canopy of a commercial awning?
Begin by assembling the main structural supports, ensuring all components are level and securely attached. Follow up with careful canopy installation, ensuring the fabric is evenly tensioned and free of wrinkles to maintain both functionality and appearance.
How can I ensure the operational safety of my newly installed awning?
To ensure operational safety, perform a comprehensive test of the awning’s mechanical movement, check motor functionality, and assess structural stability. Conduct multiple operations and inspect all connection points for security to confirm the awning is ready for use.
What should I document post-installation of a commercial awning?
Document your installation process, including photographs and notes from the testing procedures. This will create a record of your work, which is valuable for future maintenance and any potential inspections.
Recommended
Comments