
Stop Wall Damp: Pergola Guttering Systems With Z Flashing for UK Homes

Yes, pergola guttering systems work, and for most homeowners the best result comes from an integrated louvered drainage system or a professionally fitted retrofit kit, not a bolt-on gutter from a DIY shop. Both route rainwater into downpipes and away from the ground below, keeping seating areas dry and stopping water tracking into nearby walls. Integrated systems cost more but need almost no attention once fitted; retrofits suit lighter structures or tighter budgets.
TL;DR:
Integrated drainage systems are the most durable and visually discreet option, especially on new-build pergolas with louvered roofs, but they come at a higher cost.
Proper installation focuses on sealing the wall junction with flashing, respecting the damp-proof course, and ensuring correct gutter slope and post spacing to prevent leaks and overflow.
Materials like powder-coated aluminium for frames and PVC for downpipes offer corrosion resistance, while coastal or exposed locations require stainless steel fixings for longevity.
Gutter capacity and profile must match the roof’s rainfall intensity, with deeper channels and multiple downpipes necessary for heavy or sudden downpours to avoid overflow.
Proper drainage should be integrated into the pergola design from the start, with a site survey to determine roof fall, wall condition, and discharge points, reducing the risk of costly retrofits.
Table of Contents
How pergola drainage systems actually work
Two very different mechanisms sit under the phrase “pergola guttering,” and mixing them up is where most buying mistakes start.
Integrated systems, found on louvered aluminium pergolas, use grooved interlocking blades that pivot to control light and rain. When closed, water runs off each blade into a hidden trough built into the roof structure, then into internal downpipes concealed inside the hollow support posts. Nothing is visible from below or from the garden. It is the cleanest-looking option and the reason louvered roofs dominate premium pergola ranges.
Built-in gutter channels work on a similar principle but sit on solid or polycarbonate roofs rather than louvered blades. A gutter channel is fixed at the low edge of the roof and feeds an external or partially concealed downpipe, using gutter channels, downpipes and drainage outlets much like a small-scale version of house guttering.
Retrofit kits and external gutters are the practical fallback for existing structures that were never built with drainage in mind. These clip onto the roof edge after installation and are usually made from PVC.
Integrated louvered drainage suits new-build pergolas and gives the tidiest finish.
Built-in gutter channels work well on solid or twinwall roofs where a visible trough is acceptable.
Retrofit or external gutter kits suit lighter gazebo-style structures, or where a full rebuild isn’t justified.
Retrofits have real limits: they rarely handle heavy roof spans well, and clip-on brackets can work loose over a few seasons if the roof flexes in wind.
Materials, sizing and slope: what to check on a quote
Specification details separate a system that lasts a decade from one that leaks within two winters.
Materials. Powder-coated aluminium is the standard for frames and gutter channels because it doesn’t corrode and holds its colour outdoors. PVC is the usual choice for internal downpipes since it’s light, cheap, and doesn’t conduct heat into the post. If the pergola sits near the coast or a road that’s gritted in winter, ask about stainless steel fixings and brackets, since salt exposure accelerates corrosion on standard steel far faster than it does on aluminium.
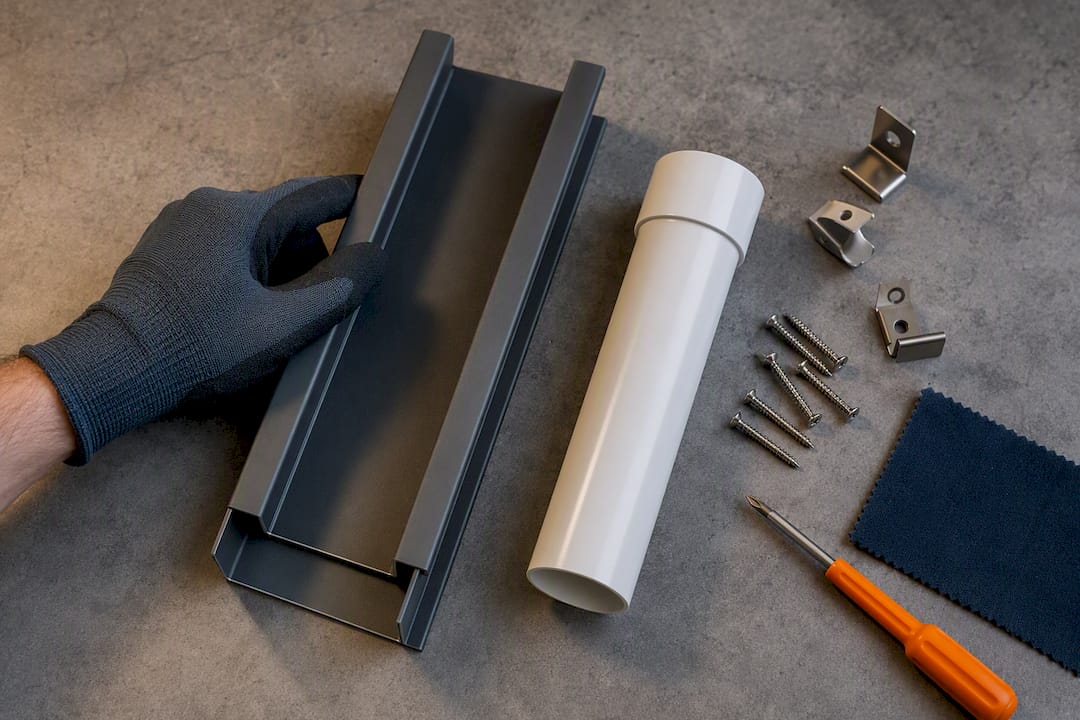
Depth and profile. A shallow gutter channel looks neat but overwhelms quickly in heavy rain, causing overflow at the front edge rather than a clean discharge into the downpipe. Deeper profiles, closer to those used on integrated commercial systems, cope far better with sudden downpours.
Slope and drainage post count. Water needs somewhere to go, and that means both a fall and enough exit points.
Statistic: installers typically work to roughly one drainage post per roof area unit commonly used by installers on louvered systems, with a subtle fall of around 6 cm from front to back built into the frame to keep water moving toward the gutter rather than sitting on the blades.
If a quote doesn’t mention slope or post spacing at all, ask directly. It’s the single most common gap between a cheap quote and a functioning system.
Installation best practice that stops leaks before they start
Most pergola drainage failures trace back to one of three fixing details, not the gutter itself.
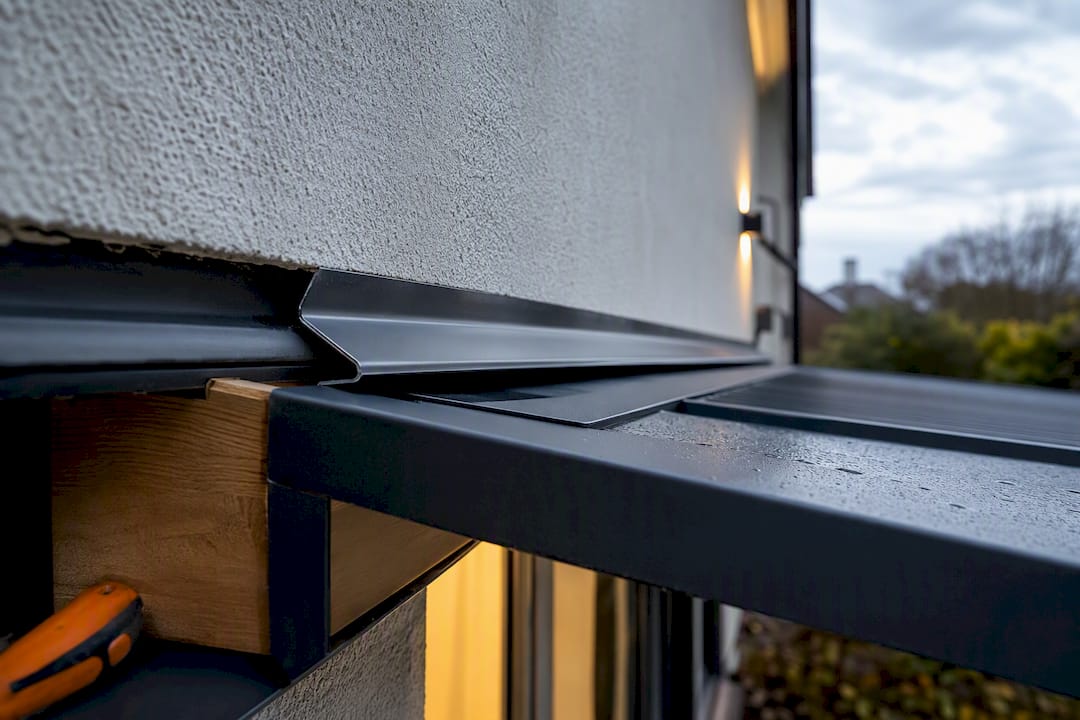
Flash the wall junction properly. On any wall-mounted or lean-to pergola, fit metal Z-flashing or cap flashing over the ledger board where it meets the house wall, and tie it into the existing weather-resistant barrier. This is the point where the vast majority of water ingress problems begin.
Never bridge the damp-proof course. Ledger brackets and flashing must sit above the DPC line, not across it. Bridging the DPC gives water a direct route into the masonry, and it’s a mistake that’s expensive to fix retroactively once render or brick has already suffered damage.
Seal every fixing penetration. Each bolt or screw through the ledger should get a bead of exterior-grade silicone as backup, even where the bracket itself claims to be weathertight. Leave a small air gap behind fixings rather than sealing them flush, so trapped moisture can escape instead of pooling against the wall.
Route gutters into a proper discharge point. Downpipes need a clear run into a soakaway, existing drain, or water butt, not a dead-end against a patio. Larger spans should carry more than one downpipe to avoid overloading a single exit.
Pro Tip: Ask your installer to show you the flashing detail before the roof panels go on. Once the roof is closed up, checking whether the flashing actually integrates with the wall’s weather barrier becomes far harder.
Full step-by-step installation sequencing, including how gutter channels and downpipes connect together, is covered in this pergola installation guide.
Maintenance and quick troubleshooting for pergola drains
A well-installed system needs surprisingly little upkeep, but “little” isn’t “none.”
Clear integrated troughs and check the exit points at the base of each post at least twice a year, and again after any serious storm.
Watch for water pooling on louvre blades, streaking down posts, or a slow trickle where you’d expect a steady discharge; all three point to a blockage or an inadequate fall.
Clean gutter channels of leaves and moss before autumn and after it, since blocked channels overflow at exactly the point where flashing was meant to protect the wall.
Regular inspection of troughs and downpipe exit points catches the majority of problems before they become structural. If you spot damp patches on an adjoining wall, standing water that doesn’t clear within an hour of rain stopping, or a downpipe that’s clearly detached inside a post, that’s a job for an installer rather than a hose and a ladder.
Pro Tip: Keep a small torch by the back door. A quick check down the post drainage point after a storm takes thirty seconds and tells you far more than staring at the roof from the garden.
Why a specialist installer changes the outcome
A proper site survey catches the details a quick online order never will.
A site visit should check the fall across the existing or planned roof, the ledger detail and wall condition, where flashing needs to integrate with existing brickwork or render, how gutters will route to downpipes, and whether those downpipes connect to a soakaway or an existing drain run. Skipping this step is how retrofit gutters end up draining onto a patio instead of away from it.
With extensive experience supplying and fitting outdoor structures in the region, and working with established manufacturers including Weinor, Llaza, Selt, Tarasola, and Morvelle, drainage is best treated as a design element from the first conversation, not an afterthought.
Before booking a quote, ask about:
Which materials are used for the gutter channel, downpipes, and fixings.
What guarantee covers the drainage components specifically, not just the frame.
What maintenance the system needs once installed, and how often.
What pergola gutter installation actually costs
Pricing varies more than most buyers expect, largely because “pergola guttering” covers everything from a clip-on PVC kit to a fully integrated louvered system.
A basic retrofit gutter kit, fitted to an existing lightweight gazebo or simple roof, sits at the low end of the market. These kits are widely available as off-the-shelf products, but fitting them properly still takes care around joints and downpipe connections. Built-in gutter channels on a solid or twinwall roof cost more, since the channel and downpipe need to be designed into the frame rather than clipped on afterwards.
Integrated louvered systems, where drainage runs invisibly through the posts, sit at the top of the price range. That reflects the engineering involved: motorised or manually adjustable blades, hidden troughs, and internal downpipes routed through structural posts are a different build to a fixed roof with a surface-mounted gutter.
Wall-mounted or lean-to pergolas often add a modest premium for the flashing and sealing work at the wall junction, since that detail takes an installer longer to get right than a free-standing structure.
The honest way to budget is to treat drainage as part of the roof spec, not a separate add-on. A cheap quote that excludes proper flashing, adequate downpipe count, or sealed fixings will look competitive on paper and cost more in repairs within a few years. Ask for drainage to be itemised on any quote so you can compare like for like.
Climate factors that should shape your gutter choice
UK weather is the whole reason this decision matters, and it’s rarely uniform across a single property.
Rainfall intensity matters more than total annual rainfall. A garden that gets short, heavy downpours needs deeper gutter channels and more downpipe capacity than one with steady, lighter rain, because shallow troughs overflow during a sudden burst even if they’d cope fine with the same volume spread over a day.
Wind exposure affects fixings and flashing more than the gutter itself. Exposed sites, hillside gardens, coastal plots, or anywhere with a clear run for prevailing wind put more strain on ledger brackets and roof joints, which is exactly where sealed fixings and proper flashing earn their keep.
Coastal or roadside locations bring salt into the equation. Salt spray accelerates corrosion on standard steel fixings noticeably faster than inland sites, which is why stainless steel components are worth the modest extra cost near the sea or beside heavily gritted roads.
Freeze-thaw cycles matter for standing water. Any gutter channel or trough that holds water rather than draining it fully can suffer cracking once temperatures drop below freezing overnight, particularly in PVC components that have gone brittle with age. Correct fall isn’t just about keeping the space dry day to day; it’s what stops water sitting long enough to freeze.
Matching drainage to your pergola’s design and materials
Not every drainage system suits every pergola, and the roof material usually dictates the options available.
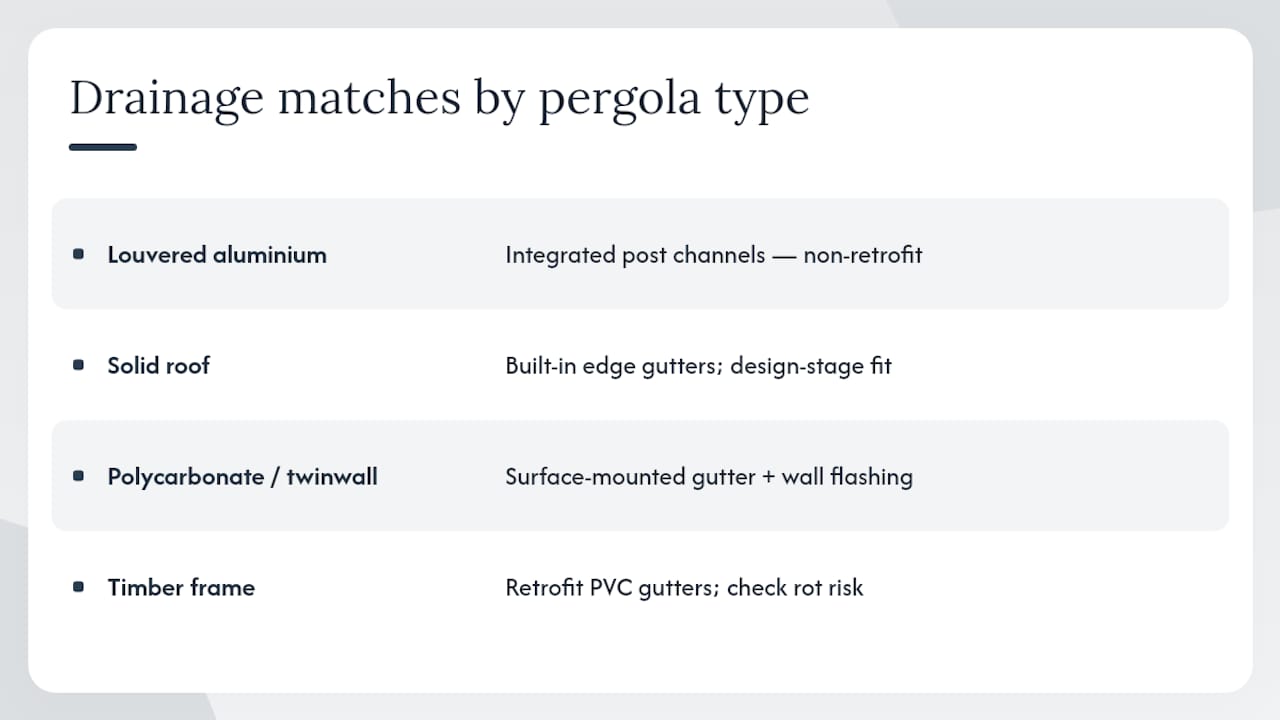
Aluminium-framed louvered pergolas are built around integrated drainage from the outset. The posts are manufactured with internal channels ready to take a downpipe, so retrofitting a different system later rarely makes sense.
Solid roof pergolas, whether aluminium panel or insulated roof systems, typically use built-in gutter channels along one or more edges. These are straightforward to specify at the design stage but harder to add convincingly afterwards, since the roof edge needs to be built to receive the channel.
Polycarbonate and twinwall roofs, common on both new installations and roofing upgrades to existing frames, generally pair with a simpler surface-mounted gutter trim along the lower edge, alongside a flashing strip where the roof meets a wall to stop water tracking sideways into the brickwork.
Timber pergolas present the trickiest compatibility question. Retrofit PVC gutter kits attach reasonably well, but the timber itself needs checking for rot risk where brackets penetrate the wood, since trapped moisture behind a gutter bracket does more damage over time than open rainfall ever would. If you’re roofing an existing timber frame rather than starting fresh, this guide to adding a roof to an existing pergola covers which materials pair well with which frame types.
Does guttering ruin the look of a pergola?
Done well, guttering disappears. Done badly, it’s the first thing anyone notices.
Integrated systems win on aesthetics because the whole point of the design is concealment: drainage running through hollow posts and hidden troughs leaves nothing visible except clean lines and closed louvre blades. This is the main reason louvered roofs command a premium over simpler alternatives, quite apart from their weatherproofing.
Built-in gutter channels are more visible by nature, sitting along the roof edge as a shallow trough, but a well-proportioned aluminium channel in a matching powder-coated finish reads as a deliberate design line rather than an afterthought. Colour-matching the gutter to the frame, rather than defaulting to whatever came in the box, makes a noticeable difference here.
Retrofit external gutters are the compromise. A clip-on PVC gutter in white or black on a coloured frame tends to look exactly like what it is: an addition. That’s not a reason to avoid retrofitting, since plenty of gardens prioritise function over show, but it’s worth knowing before you commit if the pergola sits somewhere highly visible.
The practical lesson: if appearance matters as much as performance, specify drainage at the design stage rather than treating it as something to add once the roof is up.
Building regulations and outdoor guttering rules to know
Pergola guttering itself isn’t typically subject to a specific building regulation in the way a house extension’s drainage would be, but a few related rules do apply.
Where a pergola is fixed to an existing wall, any drainage work that discharges water needs to avoid interfering with the property’s existing damp-proof course, and building control guidance treats bridging the DPC as a defect regardless of what structure caused it. This is the regulatory reason behind the flashing advice covered earlier, not just a performance one.
Discharge points matter too. Water routed from a pergola gutter into a soakaway, existing drain, or shared boundary area should not cause runoff onto a neighbour’s property, which becomes a nuisance issue rather than a building control one but carries real consequences if it happens repeatedly.
Larger or attached structures may cross into permitted development or planning territory depending on size, height, and proximity to boundaries, which is worth checking with your local authority before a significant pergola project rather than after. Freestanding, modest pergolas usually fall outside these thresholds, but rules vary by council and it is worth a quick check rather than an assumption.
None of this should put you off fitting proper drainage. If anything, it’s a reason to use an installer who already understands where flashing, DPC, and discharge routing intersect, rather than working it out project by project.
What actually matters when you’re specifying pergola drainage
The advice most homeowners get told first, usually gutter capacity or roof pitch, isn’t wrong, but it’s not where the real risk sits either. The wall junction is. Every failure worth worrying about on a lean-to or wall-mounted pergola starts at the ledger, not the gutter channel, and that’s the detail most quick quotes skip past.
Conventional advice treats flashing as a nice-to-have upgrade rather than the core of the job. It should be the opposite. A gutter with generous capacity fitted above unsealed fixings and no Z-flashing will still let water track into the wall, just more slowly. A modest gutter with correct flashing, sealed penetrations, and a DPC that’s been respected will outlast it by years.
If you’re comparing quotes, prioritise the wall detail first, materials second, and gutter profile third. Ask what happens at the ledger before you ask what the gutter’s made of. Get that answer wrong and no amount of aluminium or PVC further down the system will save you from damp getting into the house.
— Andrew
Get a pergola built around proper drainage from day one
Retrofitting a gutter kit after the fact works for light structures on a budget, but it’s a compromise, not the ideal. Drainage should be designed into the pergola from the first conversation, whether that means an integrated louvered roof with concealed post drainage or a built-in gutter channel on a solid roof, to avoid issues after installation.

A free site survey covers exactly the details this article has walked through: roof fall, ledger condition, flashing requirements, and where the downpipes need to discharge. That’s the point where a quote either accounts for proper drainage or quietly skips it, and it’s far easier to catch during a survey than after the roof panels are fixed. If you’re weighing up a new pergola for your garden or outdoor space, request a quote and ask specifically how the drainage will be routed on your property before you commit to a design.
Sources
The technical detail behind integrated drainage, wall flashing, and gutter capacity draws on a handful of specialist sources worth reading directly if you want to go deeper. The lean-to and wall-mounted pergola buying guide covers wall junction detail in full. The breakdown of integrated gutter drainage components explains materials and maintenance cycles. The drainage post spacing and fall guidance sets out the sizing rules referenced earlier in this piece.
For installation sequencing specific to UK gardens, keeping a pergola dry through UK rain and the step-by-step pergola installation guide both cover drainage as part of the wider build process.
FAQ
Can you put a gutter on a pergola?
Yes. Most pergolas can take either an integrated gutter channel built into the roof design or a retrofit external gutter kit clipped onto an existing roof edge, though the second option suits lighter structures better than large spans.
How do you install a gutter on a pergola?
Fix the gutter channel or bracket at the roof’s low edge, ensure a consistent fall toward the downpipe, and where the pergola meets a wall, fit Z-flashing over the ledger and seal every fixing penetration before connecting the downpipe to a soakaway or drain.
What are the main types of pergola guttering?
The three main approaches are integrated louvered drainage, where water runs through hidden troughs and hollow posts; built-in gutter channels on solid or twinwall roofs; and retrofit or external gutter kits fitted onto existing structures.
How do louvered pergolas drain water?
The interlocking louvre blades channel rainwater into hidden troughs built into the roof frame, which then feed internal downpipes concealed inside the hollow support posts, keeping the whole drainage route out of sight.
How often should pergola gutters be cleaned?
Check and clear integrated troughs and downpipe exit points at least twice a year and after any major storm, since leaves and debris are the most common cause of blockages and overflow.
Recommended
Comments