Step by step patio shading guide for Yorkshire homes 2026
- Andrew Crookes

- 4 hours ago
- 9 min read

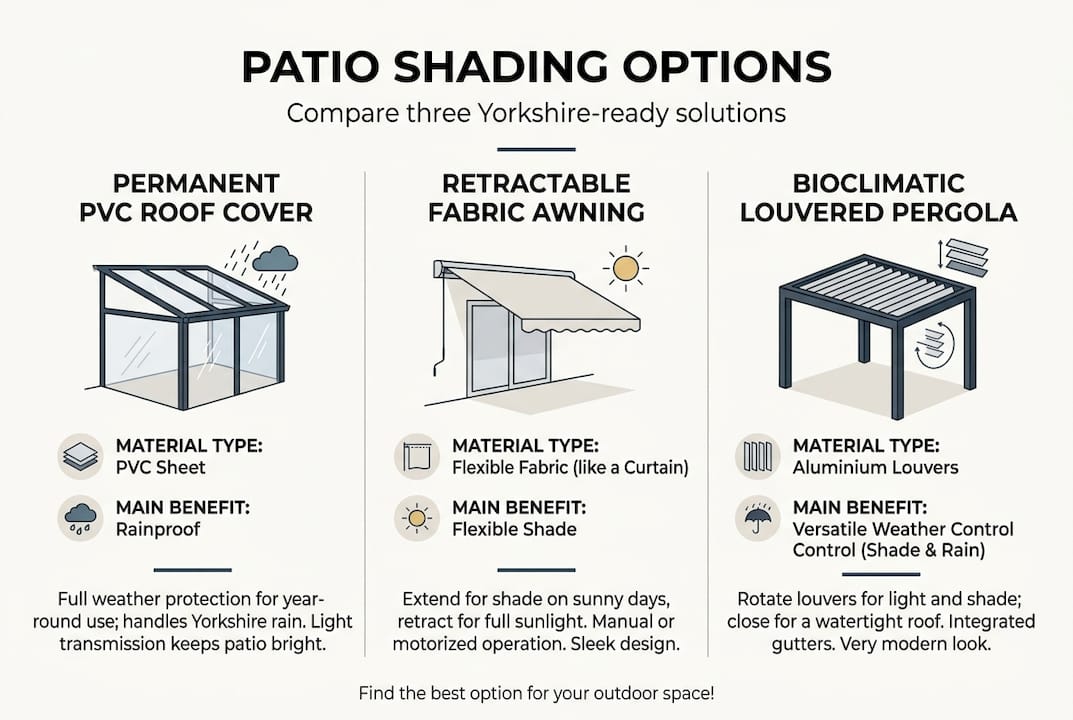
Summer sun and unpredictable drizzle make unshaded Yorkshire patios uncomfortable for outdoor relaxation. Installing proper patio shading transforms your outdoor space into a usable retreat throughout warmer months. This guide walks you through practical installation methods for three popular shading solutions: corrugated PVC sheets, pergola curtains, and shade sails. Each option suits different budgets and skill levels whilst addressing typical UK weather patterns. You’ll learn precise measurements, fixing techniques, and common pitfalls to avoid for long-lasting results.
Table of Contents
Key takeaways
Point | Details |
Multiple shading options | PVC sheets, pergola curtains, and shade sails each offer distinct benefits for Yorkshire patios |
Preparation is critical | Accurate measurements with allowances and structural checks prevent installation failures |
Proper fixing methods | Correct tools, fasteners, and tensioning ensure durability against wind and rain |
DIY saves costs | Shade sails cost approximately £200-300 for materials versus professional installation fees |
Prepare your patio for shading installation
Successful shading starts with thorough preparation. Walk your patio at different times of day to observe sun exposure patterns and identify areas needing most protection. Morning sun hits east-facing patios whilst afternoon heat concentrates on west-facing spaces. Understanding these patterns helps you position shading for maximum effectiveness.
Gather your tools before starting any installation. You’ll need a tape measure, spirit level, power drill with appropriate bits, ladder, and pencil for marking positions. Different shading types require specific materials: PVC sheets need EPDM coated screws and flashings, pergola curtains require brackets or tracks, whilst shade sails demand turnbuckles and pad eyes. Check your existing structure can support the additional weight, particularly for heavier options like solid roofing.
Measurements determine success or failure. For pergola curtains, measure with 10-20% extra width to allow fabric folds that create a professional appearance. Shade sails need anchor points 3.6m apart for a 3m sail with post holes dug 600mm deep for stability. Record every dimension twice to avoid costly material waste.
Structural support matters more than many homeowners realise. Existing pergola posts must be sound and firmly anchored before adding roofing weight. Check for rot, cracks, or movement by pushing firmly against each post. Wall-mounted brackets need fixing into solid masonry or timber studs, never just plasterboard. For new installations, position posts to align with your shading material dimensions whilst maintaining adequate clearance for doors and pathways.
Pro Tip: Mark all anchor and fixing points with masking tape before drilling to visualise the final layout and catch spacing errors early.
When choosing outdoor awnings and shading, consider these preparation essentials:
Verify planning permission requirements for permanent structures over 2.5m high
Clear the work area of furniture, plants, and obstacles
Check underground services before digging post holes
Prepare concrete mix in advance for post setting
Have helper available for lifting and positioning large sheets
Shading Type | Key Measurements | Structural Requirements |
PVC Sheets | Rafter spacing max 600mm, minimum 5° pitch | Solid timber frame, adequate pitch |
Pergola Curtains | Width plus 10-20% for folds, height to ground | Secure brackets into solid fixing |
Shade Sails | Anchor spacing per sail size, 600mm hole depth | Concrete set posts or wall anchors |
Install corrugated PVC sheets on a pergola roof: step by step
Corrugated PVC sheets combine shade and rain protection in one durable solution. These translucent panels let filtered light through whilst keeping your patio dry during Yorkshire’s frequent showers. Installation requires precision but suits confident DIYers with basic carpentry skills.
Start by checking your rafter configuration. Ensure minimum 5° pitch and maximum 600mm rafter spacing for proper support and water runoff. Inadequate pitch causes water pooling that stresses the material and creates leaks. Measure your pergola dimensions and calculate sheet requirements, remembering to overlap adjacent sheets by 1-2 corrugations.
Follow these installation steps for professional results:
Position the first sheet at the eaves with 50-75mm overhang to direct water away from the structure
Pre-drill holes through sheet peaks before fixing to prevent cracking during screw insertion
Insert EPDM coated screws with sealing washers at every third corrugation along rafters
Overlap the next sheet by 1-2 corrugations and repeat the fixing pattern
Install end flashings and ridge caps to seal edges against wind-driven rain
Add side flashings where sheets meet walls or other structures
Sheet handling requires care to avoid damage. Carry sheets on edge rather than flat to prevent flexing and cracking. Work on calm days as wind catches large sheets like sails, making positioning difficult and dangerous. Never walk directly on installed sheets; use crawl boards to distribute weight if access is necessary.
Pro Tip: Mark screw positions with a chalk line before drilling to maintain straight fixing rows that look professional and ensure even load distribution.
Screw placement affects both appearance and performance. Fix through corrugation peaks, never troughs, as this prevents water ingress around fasteners. Space fixings at manufacturer-recommended intervals, typically every third corrugation along each rafter. Over-tightening crushes the corrugations whilst under-tightening allows wind uplift.
Flashing installation completes the weatherproofing. Fit flashings with adequate overlap and seal joints with appropriate sealant rated for outdoor use. Pay special attention to the ridge where two roof planes meet, as this area experiences highest wind loads. Quality flashings prevent the most common failure points in PVC roofing systems.
The benefits of patio covers extend beyond weather protection to include increased property value and extended outdoor living seasons. Properly installed PVC roofing lasts 10-15 years with minimal maintenance, making it excellent value compared to fabric solutions requiring frequent replacement.
How to install pergola curtains for stylish shade and privacy
Pergola curtains offer versatile shading you can adjust throughout the day. Unlike fixed roofing, curtains open completely on pleasant days whilst providing privacy and wind protection when needed. Installation suits most skill levels and transforms existing pergolas without major structural work.
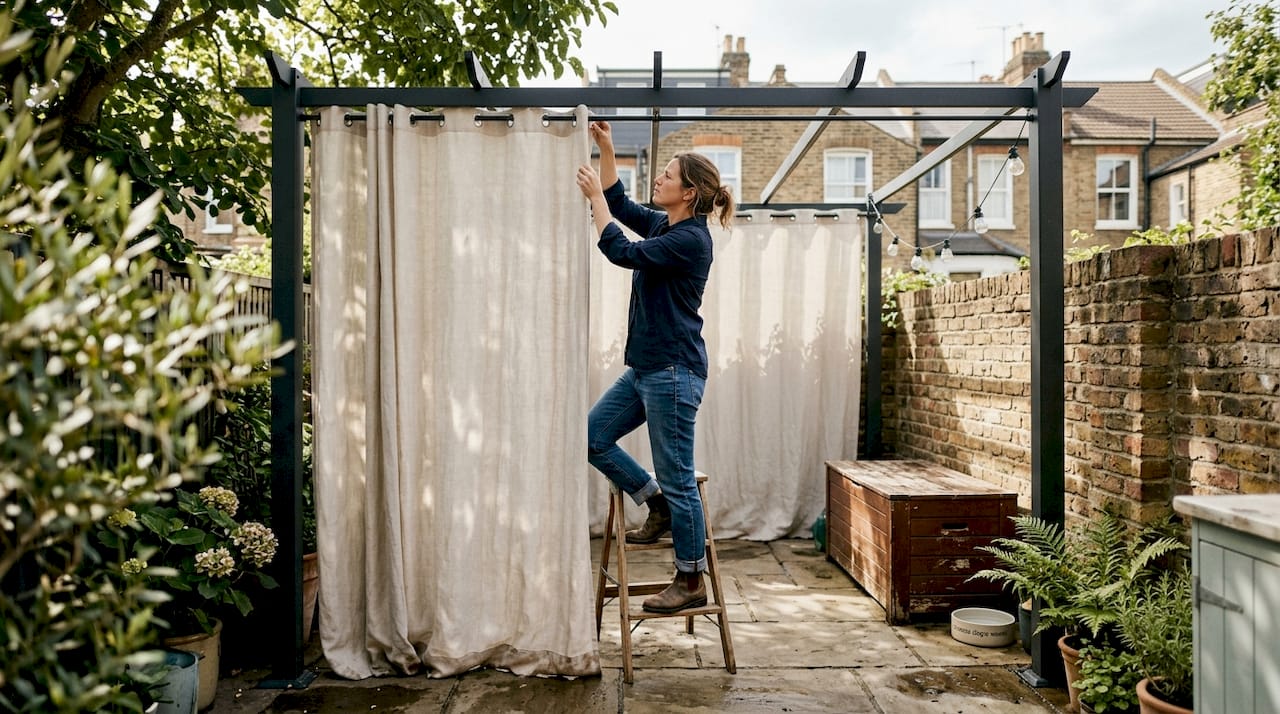
Measure curtains with 10-20% extra width for elegant folds rather than flat panels that look cheap and amateurish. Measure from your planned hanging point to the desired drop, typically finishing 50-100mm above ground to prevent dragging and dirt accumulation. Consider whether you want curtains on one, two, or all four sides based on prevailing wind direction and privacy requirements.
Choose your hanging method based on structure and aesthetic preferences:
Curtain rods provide traditional appearance and smooth operation
Track systems suit modern designs and enable effortless drawing
Wire rope creates minimalist look but requires proper tensioning
Ring and pole combinations allow easy removal for winter storage
Installation follows these straightforward steps:
Mark bracket or track positions using a spirit level to ensure curtains hang straight
Drill pilot holes appropriate for your fixing surface (timber, masonry, or metal)
Secure brackets firmly with screws or bolts rated for outdoor exposure
Install rod, track, or wire according to manufacturer instructions
Hang curtains using appropriate hooks, rings, or clips
Test smooth operation and adjust height or tension as needed
Bracket placement determines curtain performance. Space brackets every 1-1.5m along the hanging length to prevent sagging, particularly with heavier outdoor fabrics. Wall-mounted brackets need fixing into solid substrate capable of supporting fabric weight plus wind loading. Freestanding pergolas may need additional bracing if original construction didn’t anticipate curtain installation.
Fabric selection impacts both function and longevity. Outdoor-rated materials resist fading, mould, and weather damage far better than indoor curtains. Look for UV-resistant fabrics with water-repellent treatments that maintain appearance through multiple seasons. Lighter colours reflect heat whilst darker shades provide more privacy and light blocking.
Tiebacks add functionality by securing open curtains against wind. Install tieback hooks at mid-height on posts or walls, positioned to hold curtains clear of walkways. Decorative tiebacks complement your outdoor aesthetic whilst practical rope or fabric loops suit casual settings. Explore patio awning ideas for coordinating your curtains with other outdoor elements.
DIY shade sails: affordable and flexible patio shading
Shade sails deliver impressive coverage at modest cost. These tensioned fabric structures suit irregular patio shapes and create striking visual interest. Installation requires careful planning but remains achievable for DIY enthusiasts willing to work methodically.
Begin by mapping anchor points suited to your sail size and patio layout. Position anchors 3.6m apart for a 3m sail to achieve proper tension without excessive stress. Triangular sails need three anchor points whilst rectangular designs require four. Consider sun angles at different times to orient your sail for maximum shade coverage during peak heat hours.
Follow this installation sequence for secure results:
Mark precise anchor positions using string lines to visualise sail placement
Dig post holes 600mm deep for freestanding installations
Set timber posts in concrete, checking vertical alignment with spirit level
Allow concrete to cure fully (typically 48-72 hours) before tensioning
Attach pad eyes to posts or install wall-mounted anchor plates
Connect turnbuckles and D-shackles to each anchor point
Attach sail corners to shackles, starting with the highest point
Tension gradually and evenly, working around the sail perimeter
Post installation demands attention to detail. Use 100x100mm treated timber posts as minimum size for adequate strength. Set posts in concrete collars extending 150mm above ground level to prevent timber contact with soil and moisture. Brace posts temporarily during concrete curing to maintain exact positioning and vertical alignment.
Hardware quality affects sail longevity and safety. Marine-grade stainless steel fittings resist corrosion in British weather far better than cheaper alternatives. Turnbuckles enable tension adjustment as fabric stretches during initial use and seasonal temperature changes. D-shackles with screw pins prevent accidental disconnection during high winds.
Pro Tip: Tension sails to remove wrinkles but avoid over-tightening that stresses fabric and anchor points, aim for firm but not drum-tight tension.
Tensioning technique prevents common failures. Start by attaching the highest corner first, then work to opposite corners, gradually increasing tension. Check sail alignment and adjust turnbuckles to achieve even tension across all attachment points. Properly tensioned sails shed water towards edges rather than pooling in the centre, which adds weight and stress.
Cost comparison shows shade sails’ value:
Solution | Material Cost | Installation Complexity | Lifespan |
Shade Sail | £200-300 | Moderate DIY | 5-8 years |
PVC Roofing | £400-600 | Advanced DIY | 10-15 years |
Pergola Curtains | £150-400 | Basic DIY | 3-5 years |
Maintenance extends sail life significantly. Remove sails during winter months to prevent damage from snow loading and reduce UV exposure during unused periods. Clean annually with mild soap solution to remove dirt and organic growth. Inspect attachment points and hardware each spring, replacing any corroded or damaged components before re-tensioning.
Discover more outdoor shading examples to inspire your patio transformation and see how different solutions suit various architectural styles and garden layouts.
Enhance your outdoor living with quality patio shading solutions
Whilst DIY installation suits many homeowners, professional solutions offer advantages in durability, aesthetics, and warranty protection. Infinity Awnings brings over 15 years of expertise to patio shading across Yorkshire, Derbyshire, Nottinghamshire, and Lincolnshire. Our range includes premium retractable awnings, engineered pergolas, and custom verandas from leading European manufacturers.
Professional installation ensures structural integrity and weather resistance that DIY approaches sometimes compromise. Our team assesses your property’s specific requirements, recommending solutions that complement your home’s architecture whilst meeting practical shading needs. Motorised options with sun and wind sensors add convenience impossible with manual systems.
Explore Infinity Awnings products and services to discover tailored shading solutions with expert support. We offer free site surveys and detailed quotes, helping you make informed decisions about enhancing your outdoor space. Quality materials and professional installation deliver long-term value that justifies the investment. Review our guide on choosing outdoor awnings for additional insights.
FAQ
What is the best pitch angle for corrugated PVC pergola roofing?
A minimum pitch of 5° prevents water pooling and ensures proper drainage. Steeper pitches shed water faster but may reduce headroom beneath the pergola. Most installations use 5-10° pitch as an optimal balance between drainage and usable space.
Can I install shade sails myself or should I hire a professional?
Shade sails suit DIY installation with moderate skill and proper preparation. Heavy structures like solid-roofed pergolas benefit from professional installation, particularly in exposed locations experiencing strong winds. Assess your confidence with concrete work and structural fixing before deciding.
How do pergola curtains improve outdoor comfort?
Curtains provide adjustable shade and privacy whilst maintaining airflow around your patio. You can open them completely on pleasant days or close for protection from low sun, wind, or neighbours’ views. This flexibility makes curtains more versatile than fixed shading solutions.
How long do shade sails typically last in UK weather?
Quality shade sails last 5-8 years with proper maintenance and winter removal. UV exposure causes gradual fabric degradation whilst wind stress affects attachment points. Regular cleaning and hardware inspection extend lifespan, making sails cost-effective compared to replacement frequency of cheaper alternatives.
What maintenance do PVC pergola roofs require?
PVC roofing needs minimal maintenance beyond annual cleaning to remove debris and organic growth. Inspect fixings and flashings yearly, tightening any loose screws and resealing gaps where necessary. Clear leaves and branches promptly to prevent staining and maintain water flow to edges.
Recommended

Comments