Step by step pergola installation: your complete guide
- Andrew Crookes

- 1 day ago
- 10 min read
TL;DR:
Proper outdoor pergola installation requires precise layout, correct footing depth, and thorough curing to ensure stability and longevity. Attention to detail during framing, alignment checks, and timely timber treatment greatly influence the final quality. Rushing foundation curing and neglecting diagonals often cause structural misalignment and long-term issues.
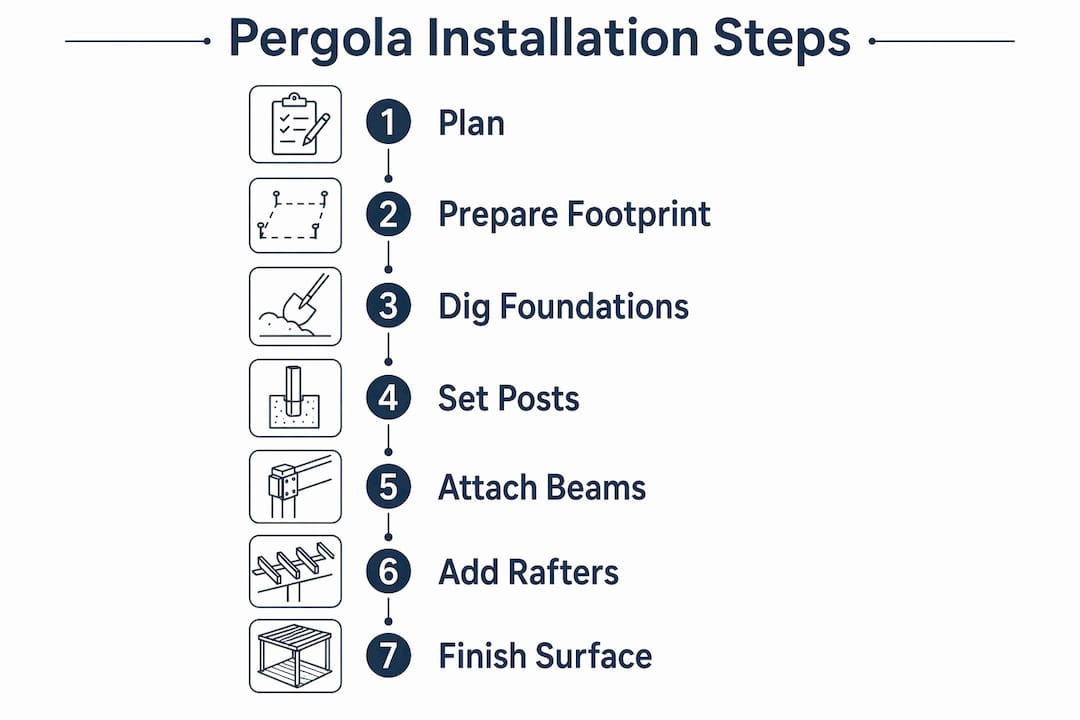
Step by step pergola installation is the process of assembling a structurally sound outdoor pergola by precisely marking the footprint, preparing compliant foundations, erecting posts, attaching beams and rafters, then finishing the structure for lasting enjoyment. Professionals refer to this as the pergola construction process, and it follows a strict sequence where each phase depends on the accuracy of the last. Get the layout wrong and every subsequent step compounds the error. Follow this guide and you will end up with a stable, attractive structure that genuinely transforms your outdoor space. You will need a spirit level, drill, measuring tape, stakes, string lines, and concrete to complete the job.
What tools and materials do you need for pergola installation?
Preparing your tools before you begin is the single most effective way to avoid mid-build delays. A DIY pergola installation stalls most often not because the task is too difficult, but because a critical tool is missing at a critical moment.
Essential tools:
Spirit level (1.2 metre minimum)
Electric drill and impact driver
Circular saw or hand saw
Measuring tape (at least 8 metres)
Concrete mixer or large mixing bucket
Post hole digger or auger
Rubber mallet
String lines and timber stakes
Square and pencil for marking
Materials checklist:
Timber posts (typically 100 x 100 mm for a standard garden pergola)
Horizontal beams (100 x 50 mm or 150 x 50 mm depending on span)
Rafters (75 x 50 mm spaced at 400 to 600 mm centres)
Post bases or concrete pier formers
Structural bolts, coach screws, and joist hangers
Bagged concrete mix or ballast and cement
Wood preservative, exterior stain, or paint
Tool | Best for | Limitation |
Post hole auger (manual) | Small gardens, soft soil | Slow in clay or stony ground |
Petrol auger (hired) | Multiple holes, hard ground | Requires two people to operate safely |
Concrete mixer (hired) | Consistent mix for multiple footings | Overkill for one or two posts |
Spirit level (digital) | Precise plumb readings | Batteries required; less robust |
Pro Tip: Hire a petrol auger from a tool hire company such as HSS Hire or Speedy Hire for a day. It cuts footing preparation time from hours to minutes and produces cleaner, more consistent holes than manual digging.
Safety gear is non-negotiable. Wear cut-resistant gloves when handling timber, safety glasses when drilling or sawing, and steel-capped boots throughout the build.
How do you prepare and mark the pergola footprint accurately?
Accurate layout is the foundation of the entire pergola construction process. Marking out with stakes and string lines using the 3-4-5 triangle method is the standard technique for confirming a perfectly square corner before any digging begins.
Follow these steps to mark your footprint:
Decide on position. Sun path and wind direction directly affect long-term comfort, so position the pergola to provide afternoon shade if your garden faces south or west.
Drive the first stake. This marks your primary corner. All other measurements radiate from here.
Run string lines along two perpendicular edges. Use a builder’s square to get them roughly at 90 degrees before applying the 3-4-5 check.
Apply the 3-4-5 method. Measure 3 ft (or 900 mm) along one string and mark it. Measure 4 ft (1200 mm) along the perpendicular string and mark it. The diagonal between those two marks must be exactly 5 ft (1500 mm) to confirm a true 90-degree corner.
Set the remaining two corners. Use the confirmed right angle to extend string lines to the full pergola dimensions, then drive stakes at each remaining corner.
Double-check all diagonals. Measure corner to corner in both directions. Equal diagonals confirm a square or rectangular footprint.
Mark footing positions. Spray paint or sand directly below each corner stake to mark where you will dig.
Confirming permits early saves significant time. Some local authorities in England require planning permission for structures above a certain height or within a set distance of a boundary, so check with your local planning department before breaking ground.
Pro Tip: Walk the marked footprint and check it from multiple angles, including from an upstairs window if possible. Perspective distortion at ground level can make a skewed layout look straight until you view it from above.
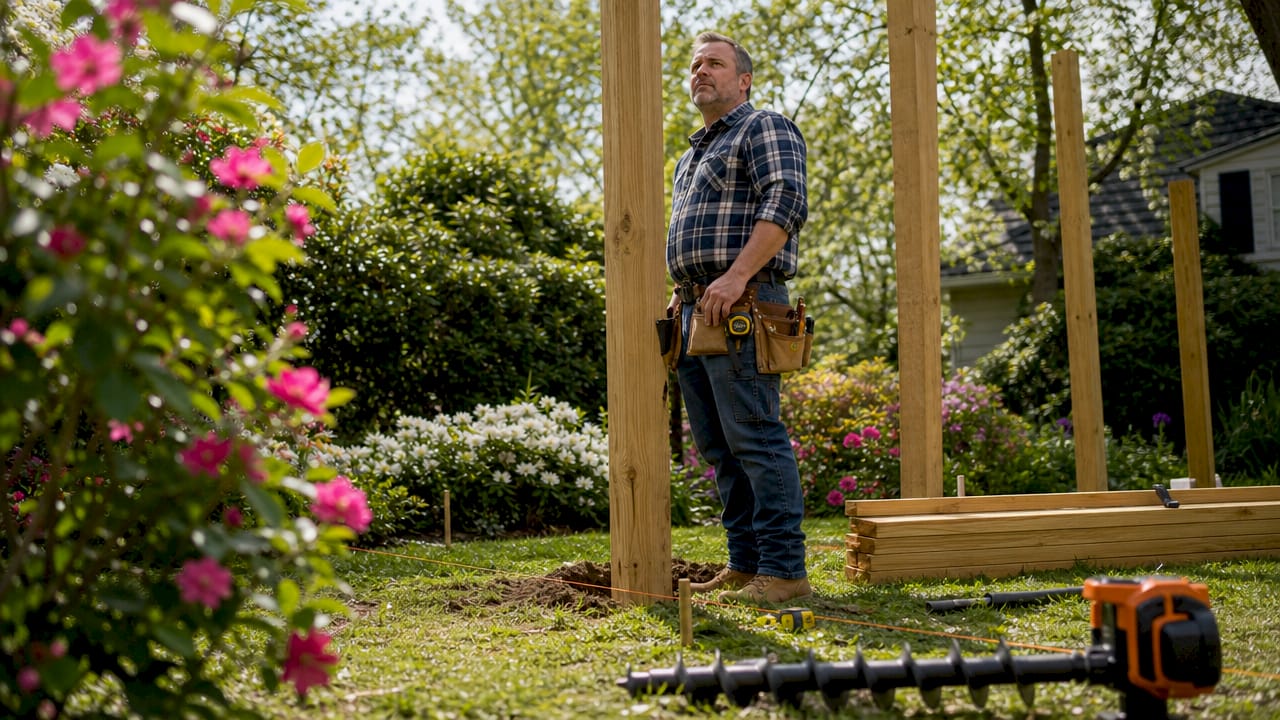
How do you dig foundations and set pergola posts?
Foundations are the most consequential part of the entire build. Concrete footings must extend below the local frost depth and at least 300 mm below undisturbed ground to meet standard structural requirements. In most parts of the UK, a footing depth of 600 mm is considered adequate for a freestanding garden pergola, though heavier or taller structures may require more.
Follow this sequence for footings and post setting:
Dig the holes. Each hole should be roughly three times the post width in diameter. For a 100 x 100 mm post, aim for a 300 mm diameter hole at a minimum.
Add a gravel drainage layer. Place 75 to 100 mm of compacted gravel at the base of each hole. This prevents water pooling beneath the concrete and reduces frost heave risk.
Mix and pour concrete. Fill each hole to within 50 mm of ground level. A standard mix of one part cement to two parts sharp sand to four parts aggregate works well for post footings.
Set the post or post base. For bolt-down post bases, set the base plate into wet concrete and align it precisely with your string lines before the concrete begins to set. For direct-set posts, insert the post into the wet concrete and brace immediately.
Check plumb on two faces. Use your spirit level on adjacent faces of the post to confirm it is perfectly vertical. Adjust before the concrete stiffens.
Brace the posts. Nail temporary timber braces from the post to ground stakes to hold the post plumb while the concrete cures.
Allow full curing time. Rushing to attach framing before concrete has cured causes settling and misalignment. Allow at least 24 to 48 hours before light work, and longer before fixing heavy beams permanently.
Important: For freestanding pergolas built over a deck, anchoring posts directly to deck boards without connecting to the underlying frame is structurally unsafe. Posts must connect to the deck’s structural framing or to independent footings through the deck surface.
Common pitfalls to avoid:
Setting posts without temporary bracing, relying on the wet concrete to hold them plumb
Pouring concrete in freezing temperatures without frost protection
Skipping the gravel drainage layer, which accelerates timber rot at ground level
Failing to check post height consistency before the concrete sets
Pro Tip: Cut all posts to the same length before setting them, then use a water level or laser level to confirm the tops are at equal height after setting. Correcting height discrepancies after concrete has cured is far more difficult than preventing them.
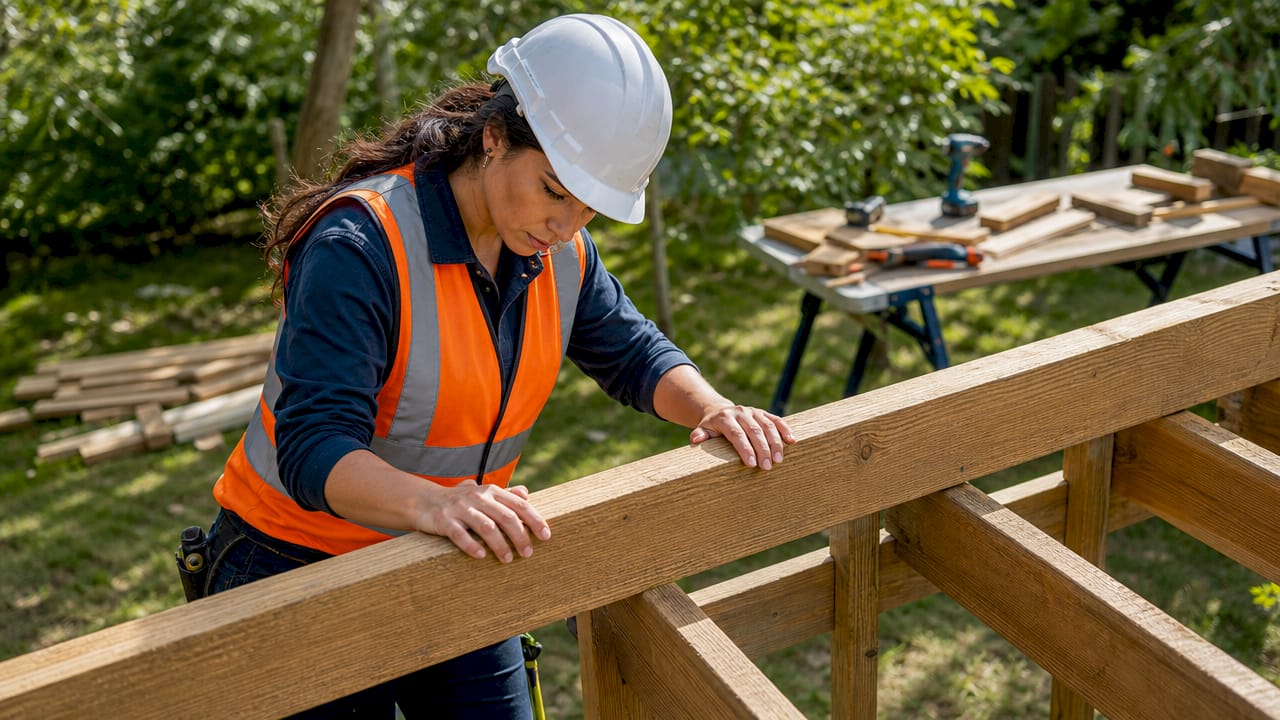
How do you attach beams, rafters, and complete the framing?
With posts set and cured, the pergola assembly guide moves into its most visually rewarding phase. Re-checking diagonals and plumb after installing the first beams is the single most important habit that separates a professional-looking result from a frustrating rebuild.
Mark beam positions on posts. Use a pencil and square to mark the exact height and position of each beam on every post before lifting anything into place.
Lift and clamp beams temporarily. Use clamps or a helper to hold each beam in position while you check level. Do not fix permanently until both beams are level with each other.
Fix beams with structural hardware. Use galvanised or stainless steel coach screws (M10 minimum) or purpose-made post-to-beam connectors. Stainless steel hardware resists corrosion far longer than zinc-plated alternatives, which matters in the UK’s wet climate.
Add corner braces. Diagonal braces between posts and beams significantly increase lateral rigidity. Fix them at 45 degrees using coach screws.
Mark rafter positions on beams. Space rafters evenly, typically at 400 to 600 mm centres. Mark both beams simultaneously using a tape measure and square to keep spacing consistent.
Fix rafters using joist hangers or notched joints. Joist hangers are faster and structurally reliable. Notched bird’s-mouth joints are traditional and attractive but require more precise cutting.
Re-check all diagonals and levels. Measure corner to corner across the completed frame. Check each rafter for level. Tighten all fixings once you are satisfied with alignment.
Hardware choices matter considerably. Use M10 galvanised coach screws for beam-to-post connections and 75 mm stainless steel screws for rafter fixing. Avoid standard bright zinc-plated screws outdoors. They corrode within two to three seasons in exposed conditions, which weakens joints and stains the timber.
For those exploring pergola roof options at this stage, the rafter spacing you choose now will determine which covering systems are compatible later.
What are the final finishing steps for a new pergola?
A final walk-around inspection checking plumb, level, and square before permanently tightening all fixings is the step most DIY builders skip, and it is the step that most directly affects long-term quality. Carry it out before you touch sandpaper or a paintbrush.
Finishing checklist:
Check every post is still plumb using a spirit level on two adjacent faces
Confirm all beams remain level and have not shifted during rafter installation
Tighten every coach screw and structural bolt with a torque wrench or impact driver
Inspect all joist hanger nails or screws for full seating
Look for any splits in the timber caused by screws placed too close to the end grain
Once the structure passes inspection, move to surface preparation. Sand all cut ends, rough faces, and any machine marks using 80-grit sandpaper, then finish with 120-grit for a smooth surface that holds treatment well. Pay particular attention to end grain, which absorbs moisture fastest and is the first point of decay.
Apply a quality exterior wood preservative as a base coat, followed by an exterior stain or paint in your chosen colour. Products such as Ronseal Total Wood Preserver or Sadolin Classic provide reliable protection in the UK’s climate. Apply at least two coats, allowing full drying time between applications.
Pro Tip: Apply wood treatment before assembling the pergola where possible, particularly to surfaces that will be difficult to reach after fixing. Treat cut ends immediately after sawing, as untreated end grain can absorb enough moisture in a single wet week to begin splitting.
Avoid painting in direct sunlight or when rain is forecast within four hours. Both conditions compromise adhesion and lead to peeling within the first season.
Key takeaways
Successful pergola installation depends on precision at every stage, from a square footprint to correctly cured foundations and corrosion-resistant fixings.
Point | Details |
Square the footprint first | Use the 3-4-5 triangle method with stakes and string lines before digging any holes. |
Respect footing depth requirements | Dig to at least 600 mm in UK conditions and add a gravel drainage layer beneath concrete. |
Cure concrete fully | Wait a minimum of 24 to 48 hours before attaching beams; longer for heavy permanent fixings. |
Re-check alignment throughout | Measure diagonals after setting posts and again after fixing beams to catch errors early. |
Finish before the weather does | Apply exterior preservative and stain after final inspection to protect timber from the UK climate. |
Why patience is the real skill in DIY pergola installation
I have been involved in specifying and advising on outdoor structure installations for well over a decade, and the pattern I see most consistently is this: the builders who struggle are not the ones who lack skill. They are the ones who rush.
The concrete curing stage is where most DIY pergola installations go wrong. I have seen homeowners attach beams within a few hours of pouring, convinced the concrete felt solid enough. It was not. The posts shifted fractionally as loads were applied, and by the time the rafters were on, the whole frame was visibly racked. Correcting that required dismantling and re-pouring two footings. The time lost was three times what patience would have cost.
The other habit I would push hard is the diagonal check. After setting posts, measure corner to corner. After fixing beams, measure again. It takes two minutes and it catches errors before they are locked in by additional fixings. Small misalignments that feel trivial at the post stage become obvious and structural at the rafter stage.
My honest advice: treat the layout and foundation phases as the entire job. If those are right, the framing and finishing are genuinely straightforward. If they are wrong, no amount of skill in the later stages recovers the result. For those who want to explore pergola design ideas before committing to a build, that inspiration is worth gathering early. It shapes decisions about size, post spacing, and rafter style that affect the construction process from day one.
— Andrew
Explore premium pergolas with Infinityawnings
If you want a pergola that goes beyond the standard DIY kit, Infinityawnings offers a range of beautifully engineered structures designed for the UK climate and built to last.

Infinityawnings supplies and installs premium pergolas across Yorkshire, Derbyshire, Nottinghamshire, and Lincolnshire, with expert guidance from initial design through to final fixing. Whether you are looking for a freestanding garden structure or a more architectural solution, the team can help you choose the right specification and finish. Browse the full pergola collection to see available styles, sizes, and options, or get in touch for a free, no-obligation quote tailored to your outdoor space.
FAQ
How deep should pergola post footings be in the UK?
In most UK conditions, pergola post footings should be dug to a minimum of 600 mm below ground level. Adding a 75 to 100 mm gravel drainage layer at the base reduces moisture retention and frost heave risk.
Do I need planning permission to build a pergola in England?
Permit requirements vary by location and structure type. Most freestanding garden pergolas fall under permitted development, but structures above 2.5 metres within 2 metres of a boundary, or attached pergolas transferring loads into a house wall, may require approval.
How long should I wait after pouring concrete before building on it?
Allow at least 24 to 48 hours before attaching light components such as post bases. For permanent beam fixings under full load, waiting 72 hours or longer produces a more reliable result and reduces the risk of settling.
What is the best wood for a garden pergola in the UK?
Pressure-treated softwood such as C16 or C24 graded timber is the most practical and cost-effective choice for UK garden pergolas. Hardwoods such as oak or iroko offer greater natural durability but cost significantly more and require different fixing techniques.
How do I keep a pergola square during assembly?
Measure diagonals repeatedly throughout the build. Equal diagonal measurements confirm a square frame. Check after setting posts, after fixing beams, and again after installing rafters before tightening any fixings permanently.
Recommended
Comments