How to install a veranda: a step-by-step UK guide
- Andrew Crookes

- May 3
- 11 min read
TL;DR:
Proper site assessment and accurate measurements are essential for a durable veranda installation.
Solid foundations and effective drainage prevent long-term structural issues and water damage.
Thorough verification after installation ensures safety, stability, and water runoff performance.
There are few things more frustrating than a garden you cannot use for half the year. British weather being what it is, particularly across Yorkshire, Derbyshire, Nottinghamshire, and Lincolnshire, a quality veranda is less a luxury and more a practical necessity. The promise is real: a well-installed veranda extends your usable outdoor space across every season. But the challenge is equally real. Get the installation wrong, and you are left with a structure that leaks, shifts, or simply looks crooked against your home. This guide walks you through every stage, from initial preparation to final checks, so you get it right first time.
Table of Contents
Key Takeaways
Point | Details |
Accurate measurements matter | Getting precise wall and ground measurements prevents installation headaches and ensures veranda stability. |
Solid foundations are vital | Concrete footings and proper drainage keep your veranda secure and lasting under UK conditions. |
Site preparation impacts longevity | Clearing obstructions and checking levels before you start means fewer issues and easier maintenance. |
Troubleshooting saves money | Careful post-install checks avoid costly repairs and preserve your investment for years. |
What you need before starting
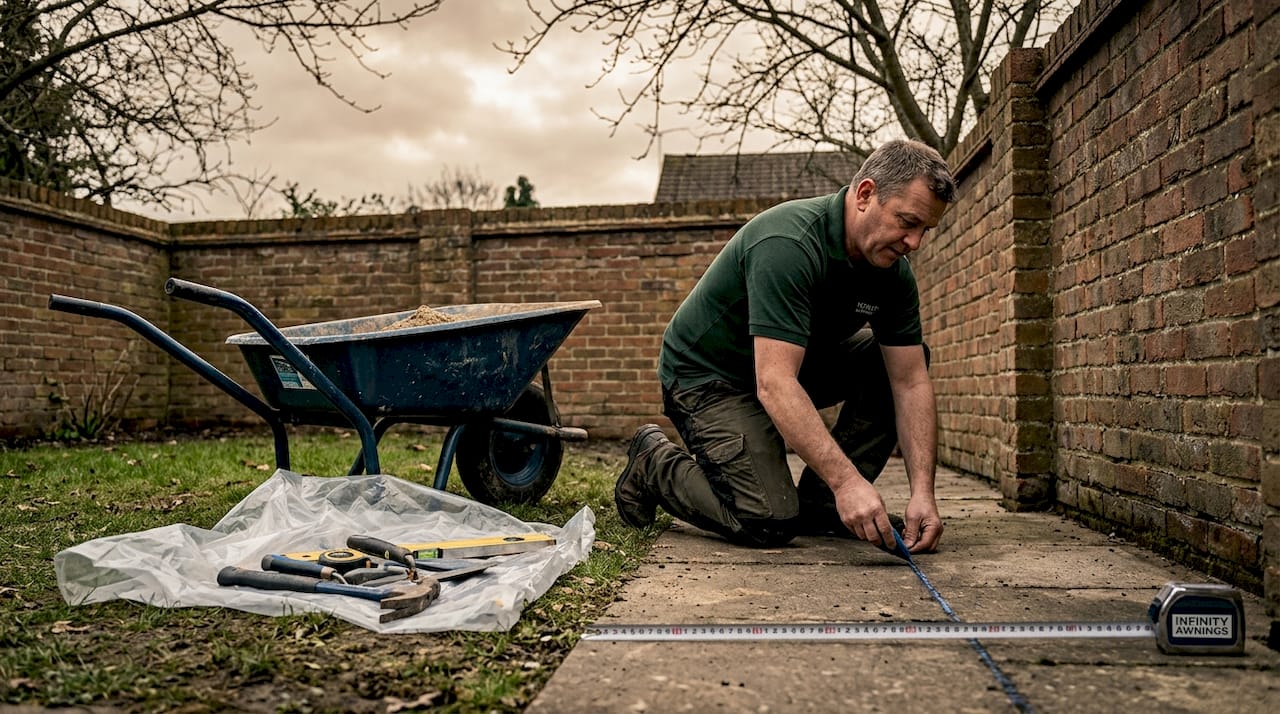
Before a single fixing goes into your wall, you need to understand exactly what you are working with. The most common reason veranda installations run into trouble is not the structure itself, it is the assumptions made beforehand. Many homeowners assume their garden is flat, their walls are straight, and their measurements are close enough. Gardens in our region rarely cooperate with any of these assumptions.
As good preparation guidance makes clear, you should measure accurately, including ground levels, and clear obstructions and cables around the wall and build zone, because real gardens are uneven and wall surfaces may conceal irregularities that affect fixings. This is not just cautious advice. It is the difference between a solid structure and one that requires expensive remedial work within a year.
Start your preparation with an honest site assessment. Walk the build zone at different times of day. Look for cables, pipes, and downpipes fixed to the wall. Check whether the wall surface is rendered, brick, or timber-clad, because each requires different fixing methods. Measure your wall width, your intended projection, and your eaves height at multiple points, not just the middle.
Essential tools and materials checklist
Having the right tools ready before you begin saves time and prevents costly mid-job trips to the builder’s merchant.
Tape measure (at least 8 metres)
Long spirit level (at least 1.2 metres)
Laser level for accurate cross-site checking
Cordless drill with masonry and wood bits
Hammer drill for brick or stone walls
String lines and pegs for marking out
Post hole digger or groundwork spade
Ready-mix concrete or bagged post-mix
Safety goggles, gloves, and steel-capped boots
Cable and pipe detector (essential before drilling)
Item | Why it matters |
Laser level | Ensures posts and beams are truly level across larger spans |
Cable detector | Prevents accidental damage to buried services |
Post-mix concrete | Faster to set than traditional mix; ideal for UK clay soils |
Long spirit level | Reveals wall bows that a short level would miss entirely |
String lines | Keep your build zone square during marking out |
The choice of all-weather veranda options also influences which fixings and materials you need at this stage, so have your veranda specification confirmed before you start gathering materials. Different veranda styles carry different load requirements, which affects post size, footing depth, and wall fixing specification.
Safety matters throughout. Turn off power at the relevant breaker before drilling anywhere near electrical cables. If you have any doubt about buried services in the garden, commission a utility survey. This is especially important in older properties across South Yorkshire and Nottinghamshire where cabling routes are rarely where you might expect them.
Site preparation: getting your foundation right
Once you have prepared your materials and understood site needs, it is time to make your garden ready for installation. This is where most DIY efforts fall short, not through lack of effort, but through underestimating what good groundwork actually involves.
Solid foundations and good drainage are among the most critical factors for long-term veranda performance. Posts need solid support, most commonly concrete footings, and water must never be allowed to pool near the base of any post or footing. On the clay-heavy soils common in parts of Lincolnshire and Derbyshire, this is particularly important, as clay expands and contracts with moisture changes, placing significant stress on any structure sitting on inadequately prepared ground.
Here is a straightforward process for site preparation:
Clear the build zone completely. Remove all pots, furniture, and surface debris. Pull up any loose paving slabs to inspect what lies beneath.
Survey the ground level. Use your spirit level and a long straight board across the full width of the site. Note the highest and lowest points and calculate any fall.
Assess drainage. Pour a small amount of water on the cleared surface and watch where it flows. Identify any areas where water pools rather than dispersing.
Mark out post positions. Using string lines and pegs, mark where each post footing will be dug. Double-check these positions against your veranda specification sheet.
Dig footings. For most residential verandas, a footing of 400mm x 400mm x 600mm depth is appropriate, though this varies by post size and ground conditions. In loose or clay soil, go deeper.
Address drainage before pouring. If water pooled anywhere near your footing positions during the assessment, lay drainage gravel in the base of each hole before adding concrete.
“Getting drainage right at the preparation stage costs almost nothing in time and money. Fixing water damage to footings and posts two years later costs a great deal more.” This principle holds across every installation we have seen across our service area.
Concrete footings vs paving slabs: what works better?
Option | Pros | Cons | Best suited for |
Concrete footings | Maximum stability, long-term durability, resists frost heave | More work to install, permanent | Larger verandas, uneven ground |
Paving slabs alone | Quick, easy to adjust | Insufficient for post loads, prone to movement | Not recommended as sole support |
Post-mix in tube former | Neat, relatively quick, good for smaller posts | Less adjustable once set | Compact gardens, lighter structures |
The choice between these options is rarely just about convenience. An installation case study in Sheffield shows how ground conditions dictate the approach, even within a single city. Gardens on sloped terrain, common in areas around the Pennines, require stepped footings or adjustable post bases to maintain a level structure without building an uneven platform underneath.
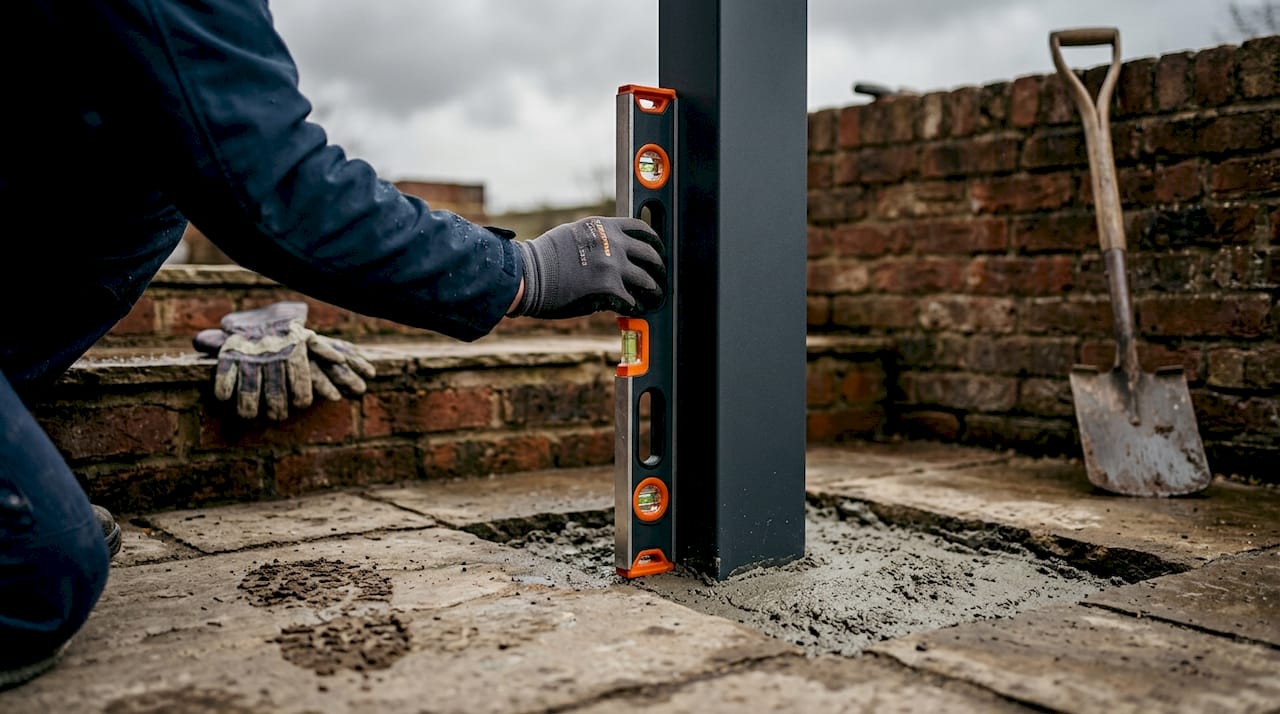
Pro Tip: Always use a spirit level to check post positions are plumb before your concrete sets. Once post-mix cures, which can happen within 30 minutes in dry conditions, repositioning is extremely difficult without digging out and starting again. Check vertical alignment in two directions, front-to-back and side-to-side, before you walk away.
Good outdoor shading tips also apply at the site prep stage: consider the sun’s arc across your specific plot during the summer months, and position your veranda to maximise shade where you actually sit, not just where the wall attachment is most convenient.
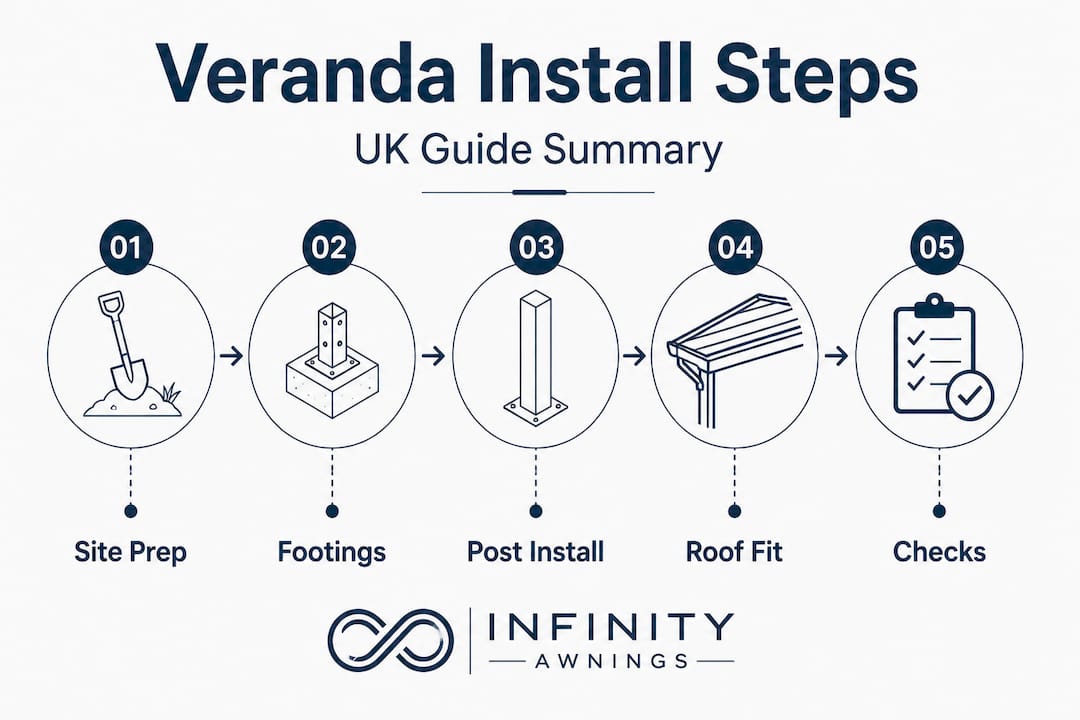
Step-by-step veranda installation process
With your site expertly prepared, it is time to set out and build your veranda, step by step. This is the part most people imagine when they think about the job, but success here depends almost entirely on the quality of the preparation done beforehand.
Good installation practice consistently emphasises measuring for squareness at the set-out stage. Before any posts go in, your marked-out build zone must be checked for squareness by measuring diagonally corner to corner. Both diagonals must be equal. If they are not, adjust your string lines until they are. This single step prevents a cascade of alignment problems throughout the build.
The installation sequence
Confirm wall fixing positions. Mark fixing hole positions on the house wall according to your veranda specification. Use a cable detector before drilling any hole.
Drill and plug the wall fixings. Use the correct rawl plugs for your wall type. Chemical anchors are advisable for older mortar or softer brick common in pre-1970 properties across Nottinghamshire and Lincolnshire.
Fix the ledger plate or wall plate. This is the horizontal member that attaches to your house wall. Get it perfectly level, as every roof panel and beam aligns from this point.
Set posts in footings. Lower posts into their prepared footing holes, use temporary bracing to hold them plumb, then pour and compact the concrete. Leave to cure.
Fit the main roof beam. Once posts are fully set, attach the front beam connecting all posts. Check level across the full span.
Install roof panels or glazing bars. Working from one end to the other, fix roof panels or glazing bars according to the manufacturer’s sequence. Do not skip ahead; each panel aligns from the previous one.
Fit guttering and downpipes. Route water away from post bases and foundation areas. Confirm fall in the guttering is sufficient for the roof area.
Final fixing check. Go around every fixing point and confirm correct torque. Loose fixings are the primary cause of early structural movement.
A key consideration for those choosing a made-to-measure glass veranda is that glazed roof panels are heavier than polycarbonate alternatives and require two people to handle safely. Never attempt to lift and position glazing panels alone.
Roof pitch is another area where decisions made early have lasting consequences. Most residential verandas in the UK carry a minimum pitch of 5 degrees to ensure effective rainwater runoff. In areas of higher rainfall, such as the western Pennine edges of Yorkshire and Derbyshire, 7 to 10 degrees is more appropriate. If shade is a priority alongside weather protection, consider adding awnings for shade to the front elevation of your veranda for adjustable solar control.
Troubleshooting and verifying your veranda
After installation, diligent checking and troubleshooting will ensure your veranda performs for years to come. Many homeowners make the mistake of considering the job finished once the last panel is in place. In reality, the verification stage is where problems surface and get resolved before they become expensive.
Thorough preparation guidance recommends checking the wall with a long straight edge and level to reveal bows or bumps. The same logic applies after installation: use a straight edge across roof panels to identify any that are sitting proud or sunken relative to their neighbours, which can create water pathways and accelerate deterioration.
Post-installation checks
Leak test. Run a garden hose across the full roof surface and check inside for any drips or wet patches along fixings and panel joints.
Structural stability. Gently push each post laterally. There should be absolutely no movement. Any flex indicates insufficient concrete depth or a loose base fixing.
Squareness verification. Re-measure diagonals of the completed structure. Slight racking can occur during the roof panel fitting stage.
Gutter fall and outflow. Pour water into the gutter at the highest point and confirm it drains freely at the outlet without pooling at any point along the run.
Fixing torque check. Using the correct tool, re-torque all structural fixings after the concrete has fully cured, typically 48 hours after pouring.
Roof panel sealing. Inspect all panel edge seals and cap strips for gaps. In cold conditions, sealants can contract slightly during fitting and leave small gaps.
Pro Tip: After any significant weather event, particularly high winds or heavy snow, inspect your roof panels and fixings before using the space beneath. Wind uplift on larger roof spans can loosen cap strips and panel fixings without causing obvious visible damage from ground level. Catching this early costs minutes; missing it can mean panel replacement.
For ongoing care, the veranda maintenance advice available from specialists gives a clear framework for seasonal checks. Understanding the different awning material options is also worth your time if you plan to add a front blind or retractable screen to your veranda, as material choice affects cleaning requirements and weather resistance significantly.
What most guides miss about veranda installation in the UK
Most step-by-step guides treat veranda installation as a universal process. In practice, installing a veranda in Wakefield, Chesterfield, or Gainsborough involves challenges you simply do not encounter on a flat suburban plot in the south of England.
Yorkshire and Midlands gardens are frequently terraced into slopes, built over Victorian-era drainage infrastructure, or bounded by walls that look plumb but are anything but. We have seen installations where a homeowner followed every step correctly and still ended up with a structure that shed water towards the house rather than away from it, purely because the ground survey was done casually rather than rigorously. That single oversight required a full roof strip and refit.
The measurement question is one we feel strongly about. Experienced installers know that what separates a veranda that looks good for a decade from one that looks tired within three years is almost always the quality of the initial survey, not the quality of the materials. Precision at the start shapes every joint, every water pathway, and every load transfer point in the finished structure.
Drainage planning is similarly underestimated. It is genuinely easier to route a downpipe away from a post footing at the foundation stage than to try to resolve water damage two seasons later. The ground around footing bases stays wetter than you think during a Yorkshire winter, and sustained moisture accelerates corrosion in metal post bases and softens even well-prepared concrete surrounds.
Our honest advice: do not rush the preparation phase. The installation itself moves surprisingly quickly once the groundwork is solid. For those choosing more complex designs, the weatherproof veranda advice we provide reflects everything we have learned from over 15 years of installations across our region.
Explore elegant veranda and pergola solutions
If this guide has shown you that veranda installation involves more precision than you initially expected, you are in good company. Many of our customers come to us after a frustrating first attempt or after realising that their garden’s particular quirks need professional assessment before any structure goes up.

At Infinity Awnings, we design, supply, and install verandas and pergolas across Yorkshire, Derbyshire, Nottinghamshire, and Lincolnshire, and we bring over 15 years of regional experience to every project. Our team handles everything from site survey to final installation, using premium products from Weinor, Tarasola, and Morvelle that are built for British weather. Explore our full range of veranda installation services and request a free quote to see what is possible for your outdoor space.
Frequently asked questions
How do I check if my garden is level enough for a veranda?
Use a long spirit level or straight edge across your planned build zone, checking for dips or bumps and measuring any slope differences. Good set-out practice confirms that measuring for level and squareness before you begin is essential, not optional.
What foundations are best for veranda posts in the UK?
Concrete footings are most reliable, especially for uneven ground and long-term stability; avoid using just paving slabs on their own. As foundation guidance confirms, veranda posts need solid support and water must not be allowed to pool near the base.
Can I install a veranda on a sloping garden?
Yes, but you will need to adjust footings to provide level support and address drainage carefully to avoid water pooling around posts. Post and drainage guidance is clear that slope increases the risk of water damage if foundations are not properly adapted.
How do I prevent water damage under the veranda?
Plan drainage from the very start, routing water away from foundation posts and ensuring no low spots exist where water can collect near the structure. Drainage planning is consistently flagged as one of the most critical factors in long-term veranda performance.
What are the most common installation mistakes?
Missing level checks, skipping drainage planning, and failing to clear wall obstructions are the most frequent causes of problems. Preparation checklists recommend clearing the terrace fully, measuring wall dimensions at multiple points, and checking ground levels throughout the build zone.
Recommended
Comments