How to Measure for Awnings: Accurate UK Guide
- Andrew Crookes

- Feb 23
- 10 min read
Measuring for a new awning can seem straightforward, but obstacles and uneven surfaces in your outdoor space make accuracy challenging. For Yorkshire homeowners looking to upgrade patios or gardens, preparing and measuring precisely is the foundation for a seamless installation. This guide delivers practical steps based on expert sources, including accurate measurement techniques and essential clearance checks, so you can confidently plan your retractable awning with lasting results.
Table of Contents
Quick Summary
Key Point | Explanation |
1. Clear the measurement area | Remove all items from the outdoor space to prevent obstruction and ensure accurate measurements for your awning installation. |
2. Identify strong mounting points | Inspect the wall or post for soundness, aiming to secure brackets into solid brick and mortar joints for optimal stability. |
3. Measure dimensions accurately | Take multiple measurements for both width and vertical drop to ensure your awning fits properly and functions as intended. |
4. Verify against specifications | Cross-check your measurements with the awning’s technical specifications and UK regulations to confirm compatibility before installation. |
5. Document and double-check everything | Write down all measurements and notes, and perform a second check to ensure consistency, providing reliable data for your installer. |
Step 1: Prepare your outdoor space for measurement
Before you measure anything, clear your outdoor area completely. You’ll get far more accurate dimensions when there’s nothing blocking your line of sight or getting in the way of your tape measure.
Start by removing everything from the space where your awning will mount. This means shifting garden furniture, potted plants, bins, and any other items that might obstruct your measurement. Think of it like clearing a path: the cleaner the area, the straighter your measurements.
Next, clear debris and level surfaces around your mounting wall or posts. Sweep away leaves, dirt, and loose stones. If there’s uneven paving or overgrown vegetation right where you need to measure, tidy it up now. This isn’t just about neatness—lumps and bumps can throw off your measurements by centimetres.
A clear, flat measurement area prevents costly errors during installation and ensures your awning sits perfectly aligned.
Check your mounting surface itself. Run your hand along the wall, fence, or post where the awning brackets will attach. You’re looking for:
Cracks or damage that might need repair before installation
Loose mortar or paint flaking away from the surface
Damp patches or staining that suggests moisture issues
Obstructions like downpipes, cables, or light fittings in your measuring zone
If you spot significant damage, address it before measuring. This protects your measurements and ensures your installer has a solid surface to work with.
Once you’ve cleared the area, step back and look at the space from different angles. Stand where you’ll typically sit or stand under the awning. This perspective helps you understand how the measurements translate to real comfort and function in your outdoor space.
Professional advice Mark your measuring zone with a piece of chalk or tape on the ground, and ask a household member to stand clear during measurements—having extra hands nearby can cause accidental obstruction when you need precision.
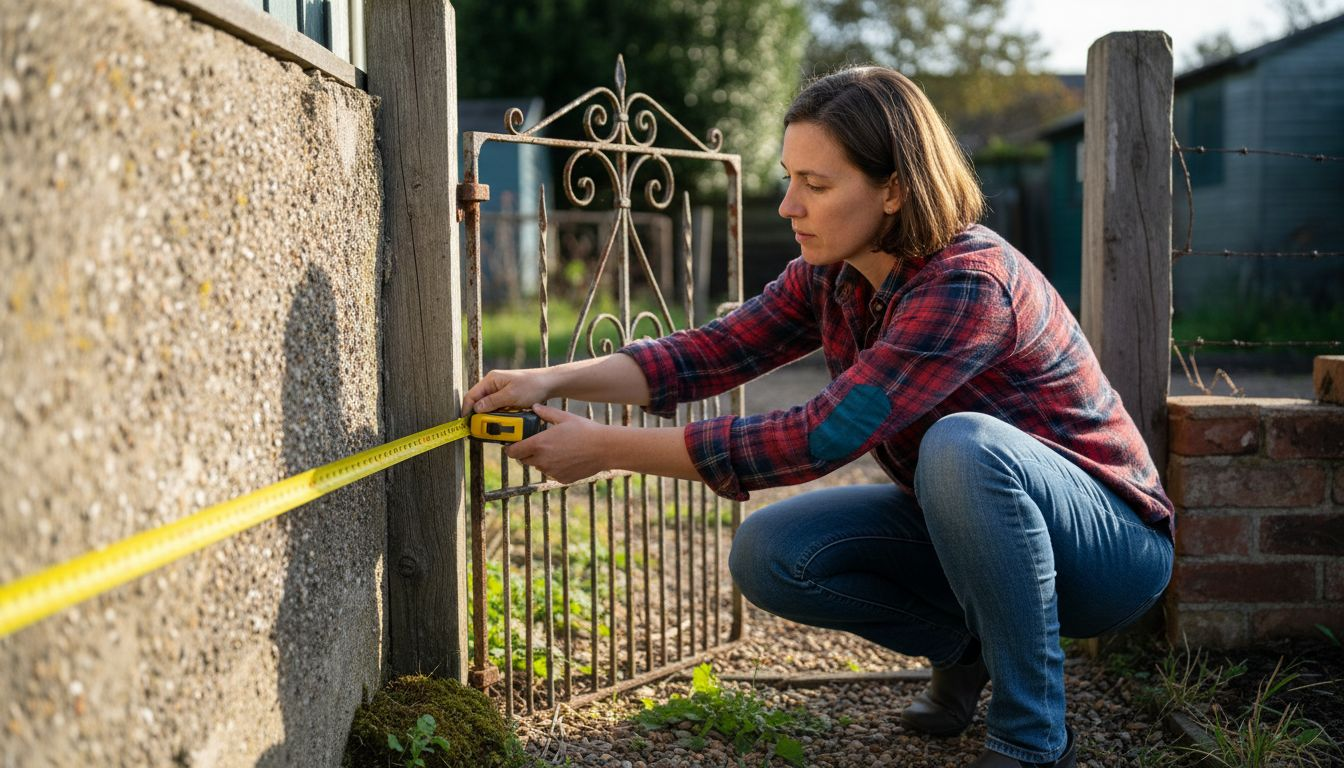
Step 2: Identify key mounting points and clearance
Finding the right mounting points is where precision matters most. Your awning’s stability and function depend entirely on securing it to the strongest, most suitable parts of your building.
Start by examining your wall or post structure carefully. Solid brick or rendered masonry walls are your ideal candidates for mounting. Run your hand across the surface to check for soundness—tap gently with your knuckles and listen for a solid, firm response rather than a hollow sound.
Look specifically for the mortar joints between bricks. These are where your brackets will anchor most securely. Avoid mounting directly into single bricks if possible, as they can crack under the weight and stress of an extended awning. Instead, position your brackets to span across multiple bricks and mortar joints for maximum strength.
If you’re mounting onto a rendered or plastered wall, probe beneath the surface to identify the solid masonry underneath. You need to reach through the render and into the brick itself. Any hollow sections, cavities, or poor-quality render will compromise your installation.
To provide clarity, here’s a summary of common wall and mounting surface types and their suitability for awning installation:
Surface Type | Suitability for Awning | Typical Preparation Required | Potential Risks |
Solid brick | Highly suitable | Clear, level, check mortar joints | Cracks, loose bricks |
Rendered masonry | Suitable if sound | Probe for solid substrate, repair weak spots | Hollow render, moisture issues |
Timber frame | Less suitable | Reinforce area, check for rot or warping | Structural weakness |
Metal cladding | Requires specialist | Ensure secure fixing points | Corrosion, insufficient hold |
Proper mounting point selection determines whether your awning remains secure through years of wind, rain, and regular use.
Understanding mounting safety requirements ensures your installation complies with UK building regulations and protects both your property and anyone using the space below.
Now measure your clearance zones carefully. These are the spaces that must remain free for the awning to function properly:
Above the awning at least 150mm clearance to soffit, guttering, or roof overhang
On both sides a minimum of 150mm from windows, doors, or other building features
Below the awning sufficient drop for safe passage and water drainage (typically 200mm minimum above head height)
Around support posts clear space for the fabric to extend and retract smoothly
These clearances aren’t suggestions—they’re essential for operation and safety. Measure twice and mark these zones on your wall with a spirit level and pencil before your installer arrives.
Check for obstacles within these clearance zones: roof tiles that protrude, aggressive mortar lines, exterior light fittings, or wall-mounted utilities. These will need addressing before installation.
Here’s a concise reference table for typical awning clearance requirements to aid measurement accuracy:
Clearance Zone | Minimum Space Needed | Reason for Requirement |
Above awning | 150mm or manufacturer value | Prevent contact with roof/gutters |
Side of awning | 150mm each side | Ensure unobstructed extension |
Below awning | 200mm above head height | Safe passage and water drainage |
Around support posts | Clear space for movement | Smooth fabric operation |
Professional advice Photograph your mounting area from multiple angles with a ruler or phone held against the wall for scale—this helps your installer assess conditions before visiting and prevents measurement surprises on installation day.
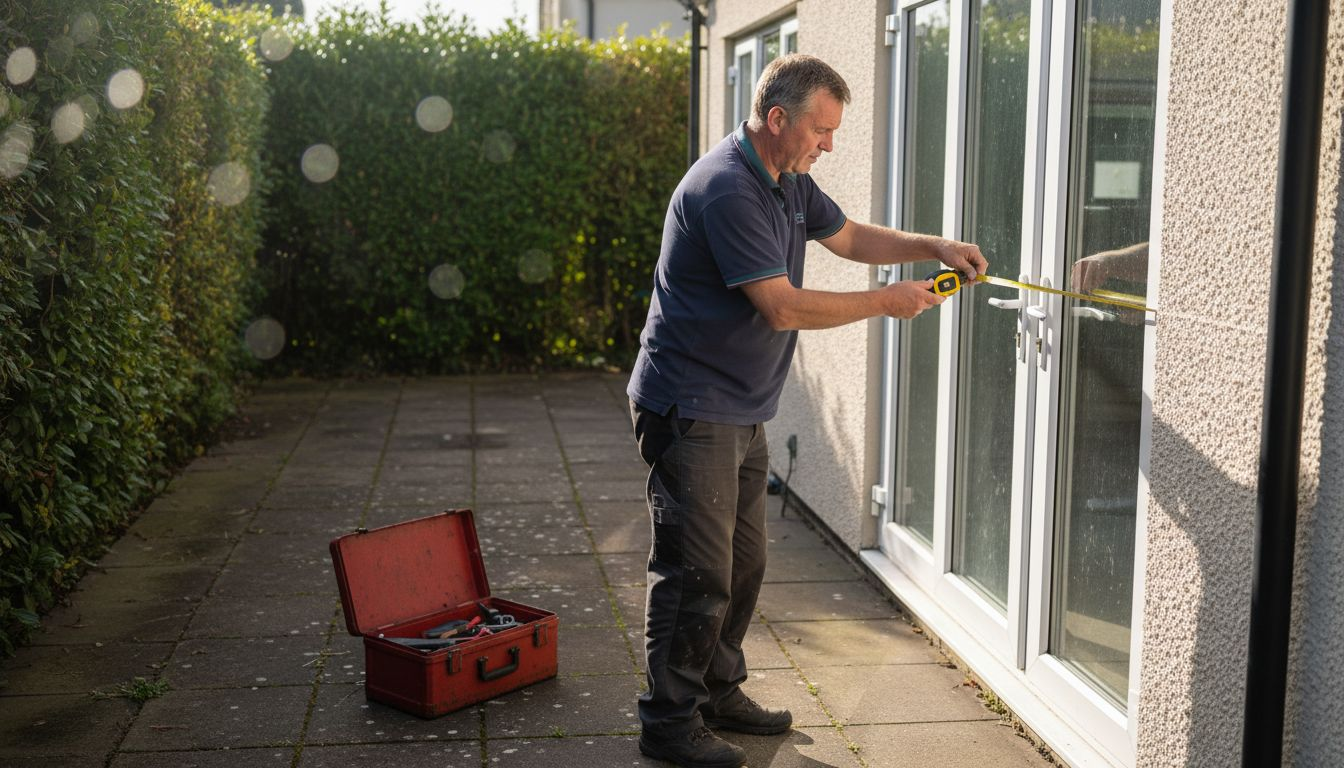
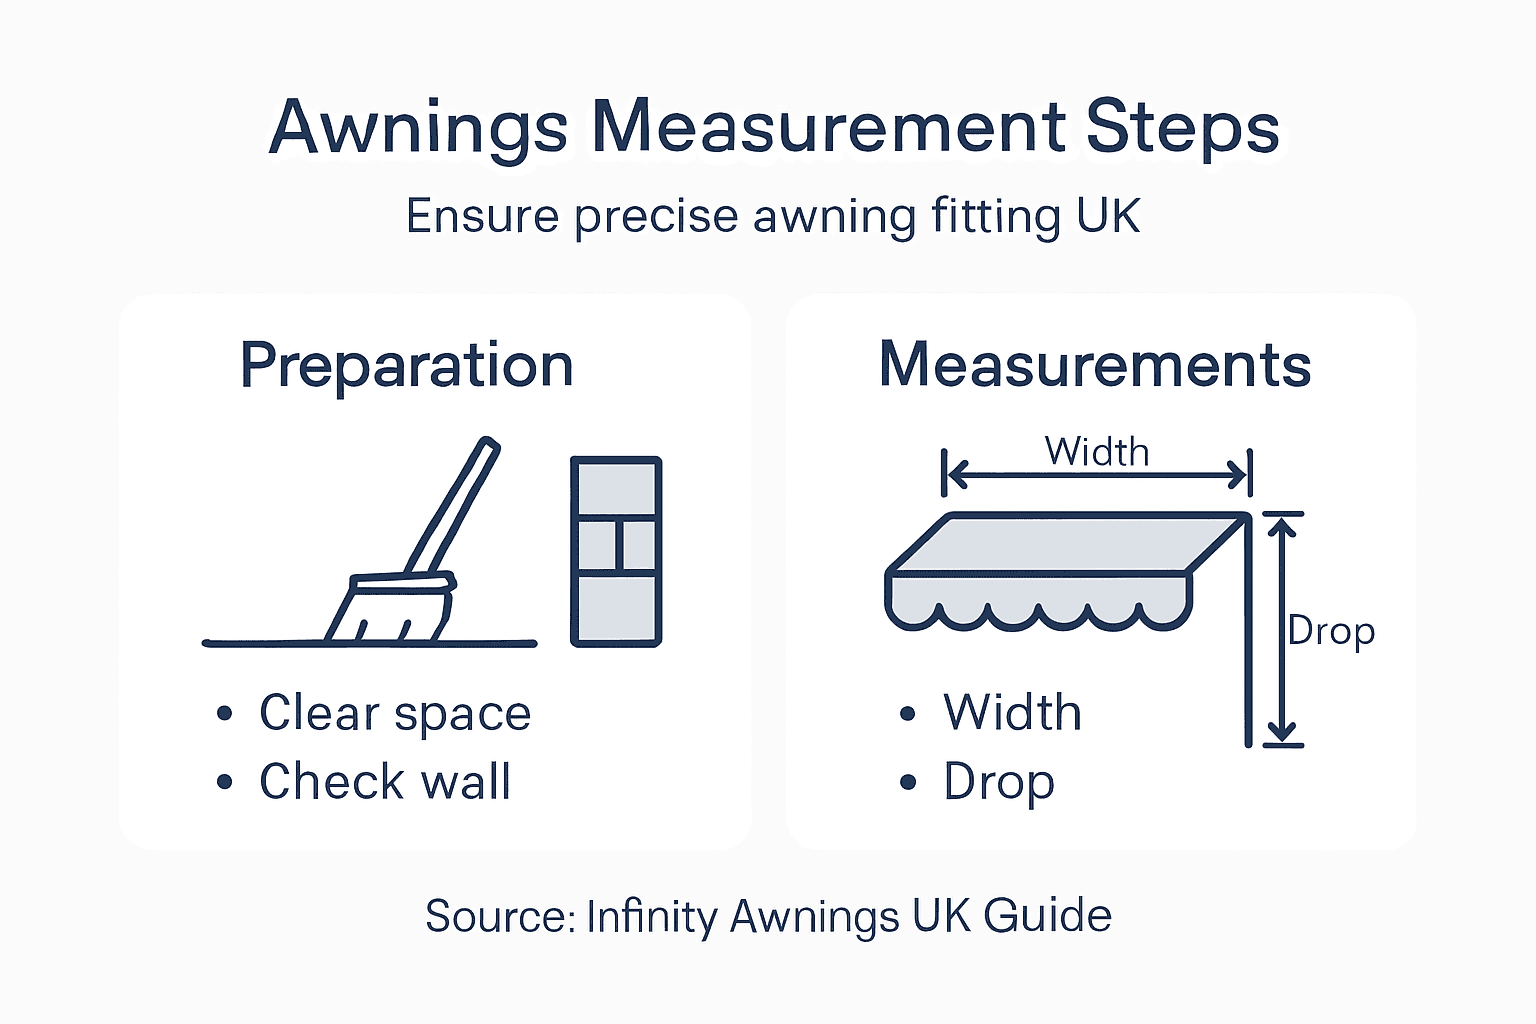
Step 3: Measure horizontal width and vertical drop
These two measurements form the foundation of your awning installation. Get them right, and everything else falls into place. Get them wrong, and you’ll face costly adjustments or worse.
Start with horizontal width. This is the distance across your wall or between your support posts where the awning will stretch. Using accurate measurement techniques ensures your awning covers the intended area without gaps or overhang issues.
Position your tape measure at the base of one mounting point. Pull it taut along the wall to the other mounting point. Measure at three heights: top, middle, and bottom of your intended mounting area. Walls aren’t always perfectly straight, and these three readings reveal any irregularities.
Record all three measurements. If they vary significantly, you’ve found a wall that isn’t plumb. Your installer needs this information to adjust bracket positioning accordingly.
Now move to vertical drop. This is how far down the awning extends from its mounting point. It determines coverage, shade quality, and how the awning functions in wind and rain.
Vertical drop affects both the aesthetic appearance and practical performance of your awning in Yorkshire’s variable weather.
Measure from your mounting point downward to the point where you want the awning’s edge to finish. Most Yorkshire homeowners prefer between 2 and 4 metres of drop, depending on their patio or terrace size. Consider these factors when deciding:
Sight lines from windows and doors inside your home
Wind exposure in your location (coastal or exposed areas need consideration)
Rainfall drainage paths across your patio or garden area
Overhead obstacles like gutters, roof edges, or neighbouring structures
Measure your vertical drop at multiple points along the width. Again, walls can slope slightly, so three measurements (left, centre, right) give your installer critical information.
Write down all measurements clearly, labelling each one. Include the date and specific location details. If your wall is uneven, sketch a quick diagram showing where measurements were taken.
Professional advice Add 50mm to 100mm extra to your vertical drop measurement as a buffer—this prevents the awning edge from sitting exactly at your intended point and accounts for fabric stretch or installation tolerance variations.
Step 4: Verify measurements against awning requirements
You’ve measured everything carefully, but now comes the crucial cross-check. Your dimensions must align with your specific awning model’s technical specifications and UK building regulations.
Retrieve your awning product documentation or the specification sheet from your supplier. This document lists the minimum and maximum dimensions your chosen awning can accommodate. Every awning model has limits—typically a maximum horizontal span and a range of acceptable vertical drops.
Compare your horizontal width measurement against the awning’s specifications. If your wall is 4.5 metres wide but your awning model maxes out at 4 metres, you’ve found a problem early. Better to know now than after purchase. Check whether the awning can be installed as a single unit or if it needs splitting into multiple sections.
Next, verify your vertical drop against the awning’s rated extension range. Most retractable awnings extend between 2 and 4 metres, but your specific model may differ. Confirm that your intended drop falls within the manufacturer’s safe operating range. Extended beyond its rating, an awning loses structural integrity and may not retract smoothly.
Your measurements must satisfy both the awning’s technical limits and UK building regulations compliance standards, ensuring safe installation and long-term performance.
Now cross-check your clearance zones. Review the documented clearance requirements you recorded in Step 2 and compare them against your awning’s operational space needs:
Fabric extension clearance needs the full 150mm (or manufacturer specification) from obstacles
Retraction space requires adequate room for the awning to fold away completely
Access zones around mounting brackets must remain unobstructed for future maintenance
Weather drainage paths must function without the awning blocking gutters or downpipes
If any measurements fall outside the manufacturer’s specifications, don’t proceed without consultation. Contact your supplier or installer to discuss options. Sometimes a different awning model fits your space better, or mounting adjustments can resolve the issue.
Document your verification process. Write down which specifications you checked and confirm they match. Keep this record alongside your measurement notes for your installer’s reference.
Professional advice Request the technical specification sheet directly from Infinity Awnings when you get your quote—they’ll verify your measurements against the chosen model and flag any issues before installation is scheduled, saving time and potential complications.
Step 5: Record and double-check all measurements
Written records transform loose measurements into reliable data your installer can trust. Without clear documentation, even perfectly accurate measurements become useless when you need them most.
Create a simple measurement sheet. Use paper or a digital document—whichever you’ll keep safe and accessible. Start by listing each measurement with its location and date. For horizontal width, record all three readings (top, middle, bottom). For vertical drop, note the left, centre, and right measurements.
Accurate and timely recording of measurements prevents costly installation errors and ensures your installer has reliable data to work with. Include additional details that provide context: wall condition, mounting surface material, any obstacles noted, and whether the surface was plumb or sloped.
Use a consistent format. Write measurements in millimetres to avoid confusion. Include unit conversions if you prefer (4.5 metres equals 4500mm). Be precise rather than rounded—“approximately 3 metres” is less useful than “2950mm”.
Thorough documentation now eliminates confusion later and protects your investment in the installation process.
Now perform your double-check. This is essential. Two days after your initial measurement, revisit the site and remeasure everything. Here’s what you’re looking for:
Consistent readings that match your first attempt (within 10mm is acceptable)
Any changes you might have missed on the first visit
New obstacles that appeared or became visible from different angles
Surface conditions you need to document for your installer
If your second readings differ significantly from the first, measure a third time. Inconsistency signals either uneven walls or measurement technique issues. Your installer needs to know this.
Compare both sets of measurements side by side. Are they close? Do patterns emerge showing where walls slope or lean? Sketch a simple diagram showing any irregularities you’ve found.
Create a final summary sheet with your best, verified measurements. Include mounting point locations, clearance zones, and any special conditions. This becomes your installer’s reference document.
Photograph your outdoor space from multiple angles. Include these photos with your measurement records. Visual context helps installers understand your space before they arrive.
Professional advice Create a folder (digital or physical) containing your measurement sheet, verification notes, awning specifications, and photographs—hand this to your installer on the day of fitting, demonstrating your thoroughness and preventing misunderstandings.
Ensure Perfect Measurements for Your Ideal Awning Installation
Measuring your outdoor space accurately is essential to avoid costly mistakes and guarantee a secure fit for your awning. The challenges of identifying suitable mounting points, maintaining correct clearance zones, and verifying horizontal width and vertical drop can overwhelm even the most diligent homeowner or business operator. Trusting these critical steps to professionals who understand UK building standards and local conditions in Yorkshire, Derbyshire, Nottinghamshire, and Lincolnshire can bring peace of mind and lasting satisfaction.

At Infinity Awnings, we specialise in guiding you through each measurement stage and tailoring retractable awnings and shading solutions that perfectly suit your unique outdoor environment. With over 15 years of experience and partnerships with top brands, we help you avoid measurement pitfalls and ensure compliance with regulations. Act now to enjoy a stylish, durable awning that enhances your outdoor living or commercial space. Start your journey with a free, no-obligation quote today at Infinity Awnings and discover how our expertise transforms your measurement efforts into a seamless installation experience.
Frequently Asked Questions
How do I prepare my outdoor space for measuring an awning?
Clear the area where the awning will be installed, including furniture and debris. Ensure the surface is level and free from obstacles to enhance measurement accuracy.
What are the key mounting points to consider when measuring for an awning?
Identify strong structures like solid brick walls or well-supported posts for mounting. Check that the mounting surface is sound and free from cracks, loose materials, or moisture damage before proceeding.
How do I measure the horizontal width and vertical drop for my awning?
Measure the horizontal width across the wall or between posts at three heights: top, middle, and bottom. For vertical drop, extend a tape measure from the mounting point down to the desired edge of the awning, recording measurements at three points across the width.
What clearance zones do I need to account for when measuring for an awning?
Ensure at least 150 mm clearance above the awning from soffits or gutters, and a minimum of 200 mm below for safe passage. Check for adequate side clearance from windows or doors as well, marking these zones clearly.
How can I verify my measurements before installation?
Compare your measurements against your awning’s specifications to ensure they fall within the required ranges. Document any anomalies and double-check your measurements after a couple of days to confirm consistency.
Why is it important to record all measurements?
Documenting measurements provides reliable data for your installer, preventing confusion later. Create a clear measurements sheet including the date and details to streamline communication and installation.
Recommended
Comments